Tag Archives: tutorial

Anel oco com ametista – Hollow ring with amethyst gemstone

Como primeira peça do curso profissional de Joalharia, fiz um anel oco. A diferença principal em relação ao anel anterior é que este tem um forro enquanto o outro tinha apenas as batas. Acho que acaba por ser mais confortável assim mas tem uma complexidade técnica adicional.

Começa-se, como sempre, de dentro para fora. Como o anel tem uma medida fixa, a peça que assenta sobre o dedo (neste caso o forro) é a que se faz primeiro. Fiz o forro com uma tira de chapa de 0,5 mm.

Em cima do forro assentam as batas, que são as paredes do anel. Fiz um fio quadrado de 2 mm que depois laminei até ficar com 1 mm de altura. Ao laminar, o fio esticou, transformando-se numa placa de 1×2,8 mm. Não é necessário trabalhar com uma bata tão larga mas não só dá mais estabilidade como dá jeito porque podemos limar à vontade para aperfeiçoar o anel sem correr o risco de ficar fina demais.

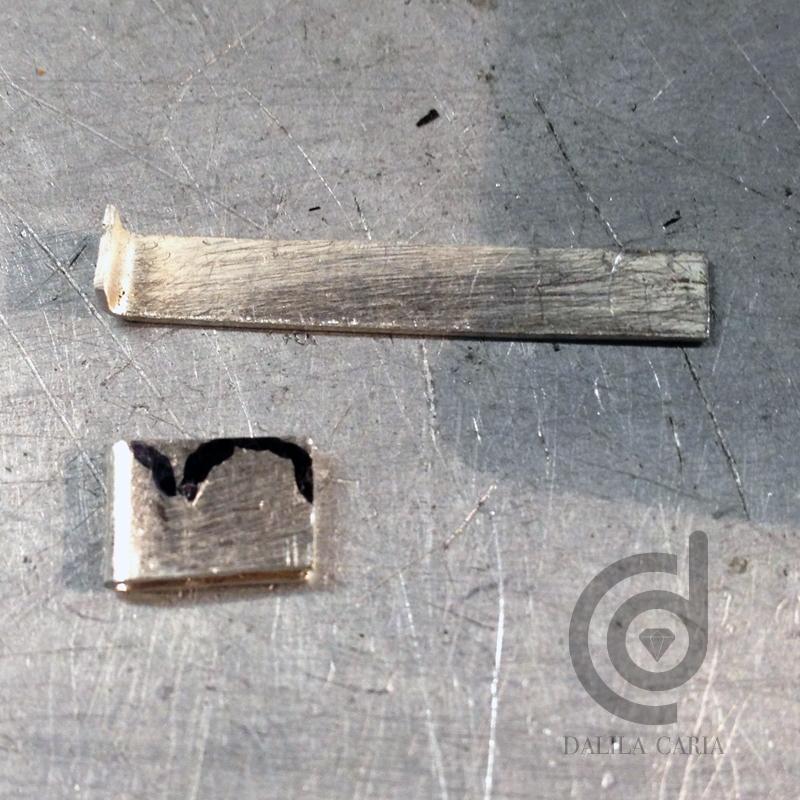
A bata é depois transformada num càrculo. Dobrar metal de forma a arredondar a parte mais larga não é tarefa fácil. Foi preciso agarrar com dois alicates e ir forçando, bocadinho a bocadinho, sempre com cuidado porque a tendência é para o metal querer dobrar pelo lado mais fino.

Quando consegui formar dois càrculos aproximadamente do tamanho certo, cortei-os ligeiramente mais pequenos do que o necessário – como ainda é preciso bater para formar um càrculo perfeito e limar o interior para retirar as marcas do arame, a dimensão tem de ser sensivelmente 1,5 mm mais pequena do que a medida do forro. Soldei as batas, formei os càrculos e depois limei-as de forma a ficarem mais grossas no topo e mais finas em baixo, para o anel ficar mais confortável.

Com as batas terminadas, fiz um novo cilindro de chapa, desta vez para a cobertura do anel. É aqui que se define se o anel é todo da mesma largura ou se é mais fino em baixo e mais largo em cima. Também se pode arredondar esta chapa para dar volume extra. Optei por fazer o anel mais fino em baixo, novamente por uma questão de conforto, mas deixei a superfàcie plana.

As batas foram então soldadas à cobertura. Começa-se por “apontar”, que significa colocar apenas um ponto de solda para permitir ajustar a posição da bata na restante secção do anel. Só depois é que se solda o resto. Nesta fase convém abusar da quantidade de solda porque há tantas soldaduras futuras que se a solda não for suficiente, e mesmo que se protejam as soldaduras anteriores, vai deixar pequenos poros que ficam feios no final. Isso pode acontecer à mesma, se existir alguma sujidade presente nas partes a soldar.

Com ambas as batas soldadas à cobertura do anel, inseri o forro e marquei os limites. Dentro desses limites fiz um desenho formado por pequenos càrculos, que furei com brocas de diferentes tamanhos. É um pormenor decorativo mas também tem uma função prática. O forro necessita de ter sempre pelo menos um furo porque ao soldar cria-se pressão dentro do anel, que é oco, e este pode rebentar se não tiver um ponto de escape. Para ajudar a furar o forro prendi-o no punho de madeira, que ajuda a estabilizar sem deformar. Depois soldei o forro, serrei o metal em excesso e a base do anel estava concluàda. Um anel sem pedra ficaria por aqui, tirando a parte de limar e polir.

Para este anel faltava criar a cravação da pedra. A pedra escolhida foi uma ametista linda que a minha sogra me ofereceu no Natal do ano passado. Para a base, laminei fio de 2 mm até obter uma chapa com 2,80×0,65mm e formei uma oval que não se via ao espreitar por cima da pedra. Como a pedra era muito alta foi necessário recortar um pouco do anel para inserir a cravação porque ficaria com demasiado volume se ficasse toda de fora. Esta parte demorou muito tempo porque o encaixe tinha de ser rigoroso, por isso era preciso limar um bocadinho, experimentar e repetir o processo as vezes necessárias até as duas peças encaixarem perfeitamente. Soldei a cravação à base do anel e depois soldei duas “tampinhas” semi circulares na base da cravação, na zona que sai para fora da base do anel.

Cortei também uma oval no forro para a luz passar pela pedra. É algo que se faz sempre com pedras transparentes ou translúcidas. Por fim soldei as garras de chapa com 0,88×1,9mm, feitas a partir de fio de 1,5mm, duas a duas, formando um U por cima da cravação, o que ajuda a mantê-las no sítio durante a soldadura. Solda-se uma de cada vez e verifica-se a posição da seguinte antes de continuar.

Com as soldaduras principais terminadas, começou o trabalho de aperfeiçoar a superfàcie do anel. Foi preciso limar até desaparecerem todas as junções, restos de solda e arestas. Quando estava tudo limpo fiz um pequeno lingote de ouro que laminei primeiro em fio quadrado de 2,5mm e depois em chapa até ficar com 3,40×0,60mm. Soldei esta chapa centrada ao longo de toda a superfàcie do anel. Nas pontas ficou ligeiramente levantada e foi soldada em cima da base da cravação.

Acabei de limar e lixar e comecei o longo processo de polimento. A pior parte de polir prata é a maldita mancha cinzenta, a que os ingleses chamam firestain, e que se forma abaixo da superfàcie do metal durante a soldadura, graças à oxidação do cobre presente na liga. É preciso gastar o metal até a mancha desaparecer, utilizando o sabão de polimento castanho, e não é nada fácil, especialmente em recantos onde as escovas não chegam. Depois de horas e horas de volta dessa fase lá consegui eliminar cerca de 90% da mancha. As peças que vemos à venda nas joalharias têm muitas vezes um banho de prata para cobrir a mancha. Há outros métodos mais industriais para remover a mancha mas implicam ácidos e máquinas que não são acessàveis a um pequeno atelier.

Antes do polimento final foi preciso cravar a pedra. Para tal é preciso retirar um pouco do metal no interior das garras para que estas dobrem sem dificuldade sobre a pedra. Para a cabeça da garra assentar completamente é geralmente necessário inserir a serra entre a pedra e a garra e gastar o metal mais um pouco, seguindo a forma da pedra. Algures durante este processo devo ter-me entusiasmado um bocadinho demais porque uma das garras partiu. Provavelmente por serem em chapa e não em fio, como as que tinha feito anteriormente, devo ter retirado demasiado metal. Foi preciso retirar aquela e soldar uma nova. Não custou muito mas a maldita mancha cinzenta voltou a aparecer e tive de polir tudo de novo. Ficaram alguns pequenos poros aqui e ali que foram impossàveis de evitar mas quando o professor diz que estou a ser demasiado perfeccionista tenho de aceitar e deixar de obcecar por isso 🙂

Por fim lá terminei o anel e até fiquei satisfeita com o resultado. É muito volumoso, mas como a pedra era grande precisava de uma base com um aspecto sólido o suficiente para a sustentar.

English:

As my first piece for the jewellery professional course I made a hollow ring. The main difference to the previous ring is that this one has an inner tube while the other had only the walls. It’s a more comfortable ring this way but it has additional technical difficulties.

You begin, as always, from the inside out. Since the ring has a fixed size, the inner tube must fit the finger and so you start with that. I made the inner tube from 0,5 mm silver sheet metal.

The walls of the ring now have to fit snugly on top of the inner tube. I made a 2mm square wire and turned it into a 1×2,8mm strip by putting it through the rolling mill which flattens and stretches the wire. It’s not necessary to use such a thick wall but it adds stability and it’s also handy in the final stages because you can sand it freely without making it too thin.

The strip is then bent into a circle. Bending a metal strip along the thicker edge is a tricky business. I had to grab it with two pairs of pliers and force it along, bit by bit, always very careful not to let it bend the wrong way. When I finally managed to form two circles of approximately the right size, I cut them slightly smaller than the size I needed because I still had to hammer them into shape and that process will stretch the metal further. the inside will also need to be filled to remove any dents, which will also increase the inner diameter. So the size of the ring should be about 1,5mm smaller than the size of the inner tube.

When they were done, I soldered the circles shut, hammered them on a ring mandrel to make them perfectly round and filled them so that the underside would be thinner than the top, to make the ring more comfortable.

With the walls complete, I made a new silver tube, this one for the outer shell. At this stage you must decide if the ring is going to be all the same thickness, if it will be flat or rounded. I decided to make the ring thinner on the bottom and thicker on top, again for a matter of comfort, but I left the surface flat.

The walls were then soldered to the shell. I started by soldering only one point in the circle so I could adjust the rest of it to the correct position before soldering the whole thing. At this stage it’s advisable to use a great deal of solder because if you use too little you risk having gaps later on because even if you protect each previous joint during subsequent soldering, the solder still tends to move a little each time. Small pores may also show up on the solder joints if there’s any dirt present when soldering. Keeping the metal clean is extremely important.

With both walls soldered to the outer shell, I inserted the inner tube and marked a line around the edges where it will be later soldered and cut. I defined the inner perimeter this way. within that perimeter, I marked and drilled several round holes in a random pattern using drill bits of different sizes. It’s a decorative detail but it’s also a practical matter. Hollow rings need to have at least one opening because when you solder it shut, gases build up inside the ring and if there isn’t an exhaust hole, it will explode. To help drill the holes, I placed the tube in a wooden holder that stabilises the ring while drilling. I soldered the inner tube to the walls and cut away he excess metal. The ring base was concluded. A ring without a stone would be concluded at this point, apart from filing and polishing.

For this ring it was time to make the stone setting. The gemstone i selected was a beautiful amethyst my mother-in-law gave me for Christmas last year. For the base, I flattened some 2 mm wire on the rolling mill until I had a 2,80×0,65mm strip, and formed an oval shape that could not be seen when you looked down from the top of the stone. Since the stone was very high, I had to cut away some of the ring shell and walls to sink the setting into it. This part took the longest because it had to be a very tight fit so I had to file away some of the metal, test the fit and then repeat over and over again until it was done. I soldered the stone setting to the ring base and then soldered some half circles to the bottom of it, to cover the parts that protrude beyond the ring.

I also cut away an oval shape in the inner tube so that light could shine through the gemstone. It’s something that should always be done for transparent or translucent stones. Finally I soldered the claws onto the stone setting. The claws were made from a 0,88×1,9mm strip, formed by flattening 1,5mm wire. I formed a U shape which allowed me to stabilise the wire and solder the claws in pairs. I soldered the first one then checked the position of the other before soldering it as well.

With all the main soldering done, it was time to perfect the ring. This meant filing away joints, solder piles and edges. When the outer shell was clean I made a small gold nugget and rolled it first into 2,5 mm square wire and then flattened it into a 3,40×0,60mm strip. I soldered this strip to the centre of the shell, all around the ring. The ends lifted slightly and were soldered to the top of the stone setting, leaving a little gap on the sides.

Finally I finished filing and sanding the whole ring and began polishing. The worst part about polishing silver is removing firestain. Firestain is a grey stain that forms just beneath the surface of silver during soldering, due to the oxidisation of copper present in the metal. To remove it you have to also remove all the metal till bellow the stain, by using tripoli. It’s not easy to remove it on small corners where the brushes won’t reach. After spending hours on this stage, I finally managed to remove around 90% of the stain. The jewellery we see in stores is often electroplated to cover the stain with a fine film of silver. There are other industrial methods to remove firestain but they use acids and machines that are not affordable for a small studio.

Before the final polishing stage I had to set the stone. The claws need to be filled a little on the inside so the metal bends easily over the stone. For the tip of the claw to bend completely over the stone it’s usually necessary to insert the jeweller’s saw between the stone and the metal and remove a little more metal, following the contour of the stone. Somewhere along this process I must have gotten a little overenthusiastic and one of the claws broke. Because the claws were made from a strip of metal rather than the usual wire, I may have removed a little too much metal from that one. It was necessary to remove it and solder a new one in its place. It wasn’t hard but the damn firestain that I had already removed was back and I had to polish it all over again. A few small pores were also visible that hadn’t been there before but I have to take my teacher’s word for it when he tells me I’m being too much of a perfectionist and stop obsessing over it 🙂

I finally finished the ring and was quite pleased with the result. It’s a bit big but the stone was rather large so it needed a ring that looked solid enough to support it.

– Identifying tools for different polishing compoundsIdentificação de ferramentas para diferentes sabões de polimento

– when polishing we use different compounds, starting with a rougher, pre-polish, compound to remove sanding paper scratches and fire scale that forms while soldering. This compound is brown in colour as is also known as tripoli.

We then move on to other compounds with an increasingly finer grain. For silver I use the green compound for polishing followed by the red one, called rouge, for shine. For other metals there are specific products, each with a specific colour – blue, white, etc.

The problem is that polishing tools – felt tips, brushes, pompons – are the same for all compounds but it’s not a good idea to use the same one all the way through. Ideally we use a different set for each compound.

To avoid confusion I have a very simple technique to tell my tools apart: I paint a line in each one using a different colour nail polish for each corresponding polishing compound. In my case, pink for tripoli, green for green and red for rouge (I should get a brown one but that’s what I had available and it still works).

You don’t need nail polish for this. Any paint that sticks to metal will work and like this you can easily avoid getting your rouge pompon dirty with green polishing compound by mistake.

IMG_0343.JPGAo polir utilizam-se diversos sabões de polimento, começando com um mais grosseiro de pré polimento, que tira os riscos da lixa e a mancha cinzenta que se cria ao soldar. Este é o sabão castanho, também conhecido por tripoli.

Depois vai-se passando para outros produtos com um grão cada vez mais fino. No caso da prata, utiliza-se o verde para polir e por fim o vermelho, também conhecido como rouge, para dar lustro. Para outros metais há produtos especà­ficos, cada um com uma cor – branco, azul, etc.

O problema é que as ferramentas de polimento – pontas de feltro, escovas, pompons – são as mesmas para todos os produtos mas não convém usar a mesma do princà­pio ao fim. O melhor é mesmo ter um conjunto para cada um dos produtos.

Para não confundir as ferramentas, utilizo uma técnica muito simples para as identificar: marco cada uma com uma tira de verniz colorido – no meu caso, rosa para o sabão castanho, verde para o verde e vermelho para o vermelho (porque era os que tinha à  mão).

Não é preciso usar verniz das unhas. Qualquer tinta que agarre bem ao metal serve para este fim e assim evitamos sujar o pompom do lustro final com sabão verde por engano.

IMG_0343.JPG

Adicionar pedra facetada a anel – Adding a faceted gemstone to a ring

Foi-me pedido para adicionar uma pedra facetada a um anel. O anel era de latão com banho de prata pelo que foi perdendo o prateado ao longo do processo. No final foi necessário dar um novo banho para reaver a cor inicial.
Aqui ficam algumas fotos do processo.

O anel original tinha uma camada de plástico a imitar uma pedra. Ao limar o topo do anel, em preparação para adicionar a virola, tornou-se claro que era feito de latão.

Comecei por marcar o centro e fazer um furo com uma broca.

Esse furo serve para inserir a serra de forma a abrir uma zona onde irá encaixar o pavilhão da pedra.

Recortei um quadrado um pouco mais pequeno do que a dimensão da pedra. Aqui vemos o processo de corte a meio.

Limei a zona cortada e usando uma agulha num punho de latão, marquei linhas no metal com as dimensões da pedra.

Limei a 45 graus para criar um bom encaixe para o pavilhão da pedra.

Verificação do encaixe

A pedra deve assentar bem sobre o anel. Se ainda ficar levantada, é preciso limar mais.

Visto por baixo, fica uma janela que deixa passar luz através da pedra.

Construà a virola em prata. Mede-se o lado da pedra e transfere-se essa medida para o metal. Esse será o local da dobra. Serra-se superficialmente no local da dobra e depois lima-se para abrir um sulco em V. Repete-se o processo em todos os cantos até formar um quadrado. Amarrei com fio de ferro para estabilizar a forma antes de soldar.

Soldei depois a virola ao anel, amarrando mais uma vez com o fio de ferro para ter a certeza que ficava no sítio certo.

Antes de cravar a pedra limei os cantos em V. Este passo nem sempre é preciso nem desejável mas a pedra era um pouco irregular e muito fina e tive receio que partisse ao cravar. Este projecto foi ainda numa fase de aprendizagem em que não tinha muita confiança na cravação de pedras com cantos.

O anel foi polido e por fim cravei a pedra na virola.

English:

I was asked to add a faceted gemstone to a ring. The ring turned out to be silver plated brass, so it was necessary to silver plate it once more at the end of the alteration.
Here are some photos of the process.

The ring originally had a bit of plastic in the place of a gemstone. After removing that and filing down the front of the ring, it became obvious that it was in fact made of brass.

I marked the center and drilled a hole.

The hole was used to pass the saw blade through.

I cut out a square that was just a little bit smaller than the gemstone. In this photo I had cut half of the square.

After filing the edges, I used a needle to mark the size of the gemstone around the hole.

I filed in a 45 degree angle to make a seat for the stone.

I checked the fit.

The gemstone should fit perfectly over the base. If you can still see the angle of the pavilion, the seat should be filed a bit more.

Seen from below, there’s an opening that allows the light to shine through the stone.

The bezel was next. I measured the side of the gemstone and used a divider to mark a line on the bezel wire. I made a superficial cut with the saw over this mark and then used the triangular file to make a deeper notch for the bend. Similar marks are made for the other corners until a square is formed. I tied the bezel with iron binding wire to keep it closed while soldering.

I soldered the bezel to the ring. Once again I used binding wire to keep it in place.
Before setting the stone I cut some v-shaped notches in the corners. This isn’t always necessary or even desirable, but the stone was irregular and very thin so I was afraid to break it if I didn’t. I made this ring at a time when I was still learning.

I polished the ring before setting the stone.

Tutorial – Como usar uma fieira para fio metálico – Tutorial – How to use a draw plate for wire

Uma fieira é uma grossa placa de aço com furos graduados. Serve para reduzir a grossura do fio metálico.

1. Lima-se a ponta do fio em bico. Um bico de 2 a 3 cm é suficiente. Pode-se voltar a limar mais tarde se necessário. Este bico serve para se conseguir passar o fio metálico através da fieira em furos mais pequenos do que a grossura do fio.

2. Aquece-se o fio para recozer, tornando-o maleável. Fiz um video que mostra o processo de recozer fio metálico.

3. Enquanto o fio ainda está quentinho (mas não demasiado quente) cobre-se de cera. Para tal basta passar uma vela ou um bloco de cera ao longo de todo o fio. A cera adere devido ao calor e vai servir de lubrificação.

fieira

4. Coloca-se a fieira num torno, de preferência um grande e aparafusado à  mesa. A mesa deve também estar presa à  parede ou ao chão para não mexer quando se puxa o fio.

5. Procura-se na fieira o furo imediatamente abaixo do tamanho do fio (o maior onde o fio já não passa). Com um alicate agarra-se a ponta do fio e puxa-se através do furo.

6. Repete-se o processo em furos cada vez mais pequenos até obter a espessura de fio desejada. Não salte furos para evitar demasiada pressão no fio metálico.

7. Deve-se recozer o fio a cada 4 ou 5 furos para evitar que fique demasiado duro, o que requer força sobre-humana para o puxar pelo furo. O arame demasiado duro també pode partir ou começar a descamar (levantam-se lascas na superfà­cie).

8. É necessário voltar a cobrir o fio com cera sempre que se recoze. É preciso cuidado com este processo porque a cera é inflamável e pode incendiar (como acender uma vela). – A draw plate is a thick steel plate with holes. It’s used to reduce the thickness of wire.

1. File one end of the wire into a sharp point. 2 to 3 cm is usually enough. You can always file it more later if necessary. This is so you can poke the wire through a hole that’s smaller than the gauge you currently have.

2. Anneal the wire to make it soft. I made a video on how to anneal wire.

3. While the wire is still warm (but not too hot), pass a candle or block of wax over it to coat it. The wax acts as lubrication, allowing the wire to run through the plate more smoothly.

fieira

4. Hold the draw plate securely into a sturdy bench. The bench or table which holds the vice should be attached to wither the wall or the floor, otherwise you risk pulling it along with the wire.

5. Find the hole in the draw plate that is just under the size wire you have. Use sturdy pliers to grip the tip of the wire and pull it through.

6. Continue pulling the wire through each of the increasingly smaller holes until you reach the desired gauge. Don’t skip steps to avoid putting unnecessary strain on the wire.

7. You should anneal the wire every 4 or 5 holes to keep it pliable, otherwise it will harden too much and you need superhuman strength to pull it through the hole. If the wire hardens too much it may also break or starts flaking (chips start appearing on the surface of the wire).

8. Always reapply wax after annealing. Be careful when annealing wire that has been coated in wax. Wax is flammable and may catch fire (like lighting a candle).

Anel de prata e ametistas – Silver and amethyst cabochon ring

A penúltima peça de joalharia do primeiro ano do curso foi um anel com 3 ametistas.

O objectivo do exercàcio era fazer uma anel em chapa com bata. A curvatura e a forma geral eram ao meu critério. Optei por um anel mais estreito atrás, por uma questão de conforto. Para tal corta-se a chapa em losango que depois é encurvado na embutideira e soldado na zona mais fina, formando o corpo principal.

silver ring tutorial by Dee Caria

As batas (fio que dá espessura ao anel para não ficar apenas uma chapa fininha) foram feitas com fio de 1mm quadrado e soldadas por dentro da chapa, uma de cada lado. Não é um processo fácil devido à curva da chapa. As batas devem encaixar na chapa mas geralmente tendem a descair. Convém amarrar tudo com fio de ferro para ter a certeza que não descaem quando a solda começa a correr.

Convém também que a soldadura da bata coincida com a soldadura da chapa do anel, para a eventualidade de ser necessário serrar o anel (apara alterar o tamanho, por exemplo) se poder serrar tudo de uma só vez.

silver ring tutorial by Dee Caria

Para maior segurança na soldadura, comecei por colocar apenas um palhão de solda e depois de ter a bata presa por esse ponto, acertar a curvatura e só então soldar o resto. Tentar fazer tudo de uma vez tem mais tendência para dar problemas.

Nesta altura fiz alguma limpeza da superfàcie e arredondei as arestas. Foi um passo necessário porque depois de soldar mais elementos em cima da base torna-se mais difàcil corrigir certas imperfeições. O problema é que ao retirar o excesso de solda cedo demais, corre-se o risco da solda mexer quando se aquece outra vez e ficar com pequenas zonas por preencher. Mesmo utilizando o corrector para proteger as soldaduras anteriores, isso tem tendência para acontecer. A melhor forma de o evitar é usar solda com diferentes pontos de fusão – começar com uma com menos cobre para as batas e depois usar outra com mais cobre para o resto.

Com a base do anel completa, fiz virolas para os cabochons de ametista. As virolas são feitas com uma tira de prata com 0,3 mm de espessura para ser fácil de pressionar sobre as pedras. A base teve de ser limada até seguir a curva da chapa, antes de soldar. Amarrei as virolas à base com fio de ferro para as manter no lugar durante a soldadura. Com as virolas no sítio, fiz um furinho na chapa de base, no centro de cada uma, e serrei o excesso de metal para que a luz passe através da pedra.

silver ring tutorial by Dee Caria

Fiz duas alianças de fio redondo e dois S que coloquei como elementos decorativos, por cima e por baixo das virolas. Depois lixei a superfàcie, satinei com a fresa de diamante para dar alguma textura àsuperfàcie e assim permitir ao oxido uma melhor fixação, e cravei as pedras.

silver ring tutorial by Dee Caria

Por fim oxidei a peça. Para oxidar uma peça parcialmente, o método mais simples é aquecê-la ligeiramente (se as pedras forem resistentes à temperatura) e aplicar o óxido com um pincel fino. Depois é só polir as zonas que não ficaram oxidadas e dar apenas uma breve passagem nas zonas oxidadas para que fiquem com um pouco de brilho mas sem retirar a cor.

silver amethyst ring by Dee Caria

English:
One of the last pieces from the basic jewellery course I’m attending was an amethyst ring.

The goal of the piece was to make a domed ring with an inner wall. This adds a certain dimension to the band without the need to use heavy gauge sheet. The curvature and general shape of the ring were up to me. I chose to taper the ring toward the back, so it fit more comfortably on the finger. I’m not used to wearing such wide bands, so this was my compromise.

To make the ring band I cut a lozenge shape out of 0,5 mm (24 AWG) silver sheet, curved in on a doming block, sized it and soldered the thinner end together. The size should be a little larger than the intended finished size because the inner walls will take up some room on the inside of the band.

The inner walls were made from 1 mm (18 AWG) square wire, formed into two circles and then curved until they followed the edges of the ring band, which in this case had a slight curve to it, due to the tapered shape. The walls must fit perfectly inside the ring band.

Due do the domed shape of the band, these inner walls tend to slip into the ring rather than stay put at the edges like intended. I used iron binding wire to secure them in place while soldering. The best technique is to find one spot where the wall meets the band in the exact place you want it and add some solder to that spot only. Once this spot is secure you can more easily manipulate the walls to fit better all around before soldering the rest.

It’s also a good idea for the join of the walls to coincide with the join on the band so that, in case you need to saw it open (to adjust size, for example) you saw the whole thing over the soldered join rather than risk cutting the walls into bits that could move when the ring is re-soldered.

At this point I did some cleanup and rounded the edges of the ring. After soldering other elements on top it gets harder to reach certain areas and might be impossible to correct certain imperfections. On the other hand, when possible I only clean solder joins at the end because when I solder again the solder may move and create pits or small gaps. The best solution for this problem is to start with hard solder for the structure of the ring and then move on to medium.

Once the ring base was done I made bezels for the amethyst cabochons I had chosen for this piece. The bezels were made from a silver strip 0,3 mm thick (28 AWG) so they were thin enough to easily bend over the stone. The base of the bezels had to be filed until it conformed to the dome shape of the ring. I tied the bezels to the ring shank with iron binding wire to secure them before soldering. After soldering the bezels in place I drilled a hole in the center of each one and sawed off excess sheet metal from underneath the stones. This is done so that light can shine through the stone. It also helps if you need to push out the stone at some point.

I made another two circles out of 0,9 mm (19 AWG) round round wire that fit over the edge of the band on both sides. I also created some decorative S shapes to solder on the sides of the cabochons.

Once all the soldering was done I sanded the ring with 400 and 600 grit sandpaper and used a diamond burr to add texture to the outer surface of the ring. Liver of sulfur, used to darken the metal, adheres better to a textured surface.

I set the amethyst cabochons. I used a burnisher to finish polishing the bezels after setting.

Finally I applied the LOS (liver of sulfur). To partially oxidise the piece, the best method is to heat it up just a bit with the torch and then apply the patina with a thin paintbrush. I did a final polish to remove any patina stains from areas that should be bright and buffed the oxidised area briefly to bring out some shine.

Pregadeira Manuelina – Manueline inspired brooch

As minhas aulas de joalharia continuam a correr bem. É pena que sejam só quatro horas por semana porque demoro imenso tempo a terminar uma peça, mas gosto muito de lá estar. O ambiente é óptimo e faz-me bem interagir com outros humanos ocasionalmente, especialmente com pessoas que partilham os mesmos interesses. Estar no atelier é completamente diferente de andar na escola porque ninguém está lá por obrigação. Há sempre alturas mais frustrantes, em que as coisas correm mal ou em que é preciso fazer uma tarefa mais monótona ou complicada, mas o nàvel de queixume geral é surpreendentemente baixo. Grande parte disso deve-se ao professor que é extremamente positivo e faz um esforço enorme por manter toda a gente motivada.

Terminei finalmente a segunda peça do curso. Foi uma pregadeira, com tema lançado pelo professor: monumentos portugueses. Escolhi o Convento de Cristo em Tomar. Inicialmente pensei basear-me numa escada em caracol mas posteriormente optei por uma janela. Não a famosa janela Manuelina mas uma outra, redonda, que se situa por cima dessa. O aspecto da janela faz-me lembrar o obturador de uma máquina fotográfica e tem o mesmo desenho em espiral da escada que eu tinha escolhido inicialmente.

Janela que inspirou o design da peça

Para não criar algo terrivelmente óbvio, acabei por usar a distorção da perspectiva causada pela foto para criar uma peça oval em vez de redonda, com a abertura da janela, onde iria assentar uma pedra, descentrada.

estudos para o projecto

Estabelecido o desenho da peça, foi necessário cortar as várias chapas que iriam ser soldadas, sobrepostas.

As chapas foram depois embutidas para ficarem com uma curvatura e montadas temporariamente numa base de plasticina até se obter o encaixe perfeito entre todas as peças.

Como é praticamente impossível soldar uma peça desta complexidade aos bocadinhos, esta montagem temporária foi coberta com gesso para manter todas as placas no sítio. A peça foi retirada da plasticina, ficando presa ao gesso. Esta montagem permitiu fazer os primeiros apontamentos de solda.

Quando as peças estavam todas soldadas numa ponta, foi possível retirar o gesso e proceder ao resto da soldadura.

Quando estava tudo finalmente montado e soldado, foi a vez de fazer a bata. A bata é uma tira metálica que serve para dar altura à peça. É particularmente importante em peças como pendentes ou pregadeiras, para que estas ganhem algum destaque em vez de ficarem planas junto ao corpo.

As batas não têm de ser muito grossas mas como a peça era grande, ficou com cerca de um milàmetro de espessura. Depois de laminar a chapa com a altura e espessura correctas, cortei secções do tamanho de cada uma das placas do topo para manter a saliência dos cantos. Soldar a bata foi complicado porque esta não tinha apoio. Estabilizar uma peça com um centàmetro de largura sobre uma superfàcie curva, tendo a certeza que fica alinhada com o limite da chapa de base e não cai durante o processo é um verdadeiro quebra-cabeças. Assentei a peça numa base de gravilha (areia térmica) para dar estabilidade e prendi a bata à peça com fio de ferro mas, como a base era redonda, o fio tinha tendência para escorregar.

Foi um processo longo e algo frustrante porque ocasionalmente a bata mexia na pior altura possàvel e era difàcil voltar a prendê-la na posição correcta, já para não falar na complicação que foi preencher todas as juntas de solda sem ficar nenhum furinho. Como a curvatura das diversas peças era diferente, foi complicado ajustar perfeitamente a curvatura da bata, o que criava pequenos espaços aqui e ali. A solda não serve para preencher espaços pelo que foi preciso alguma ginástica para completar o processo com um acabamento perfeito. O outro problema técnico é que a peça tinha muito metal, o que quer dizer que é difàcil de aquecer uniformemente. Isso implica que a solda nem sempre corria na direcção desejada e era muito fácil derreter soldaduras anteriores. Usei e abusei do corrector e mesmo assim foi necessário acrescentar solda nalguns pontos onde a solda anterior teimava em fugir. Foi de facto um puzzle complicado de montar.

Quando estava tudo finalmente montado, foi necessário fazer um acabamento prévio. Limei e lixei as arestas e arredondei a peça para a junção da bata com a chapa ser menos evidente e a peça ter um aspecto mais coerente por inteiro. Este tipo de acabamento só se costuma fazer no fim mas como precisava de soldar mais elementos em cima desta forma base, precisei de o fazer agora.

A fase seguinte consistiu em enrolar dois fios de prata de 0,7 mm para criar as cordas, elemento tàpico da arquitectura Manuelina. Já tinha feito cordas de dois fios enrolados, mas sempre com fio comprado já na espessura certa e recozido. Neste caso tive the passar o fio na fieira para o por com a espessura indicada e recozer o fio com o maçarico. Recozer fio uniformemente com maçarico é complicado. O resultado é muitas vezes irregular, o que faz com que o fio não enrole todo da mesma forma. Para resolver esse problema, tive a ajuda do professor Paulo que foi aquecendo os fios com o maçarico, enquanto eu enrolava. Acredito que dê para fazer isto só com uma pessoa mas é muito mais complicado e uma pequena distracção pode derreter o fio todo.

Depois de cortar as secções de “corda” à medida, fiz um apontamento de solda sobre a bata e depois moldei a corda à forma das chapas antes de soldar a outra ponta. Mais uma vez, manter as pequenas cordas no sàtio certo não foi fácil, mas menos complicado do que soldar a bata. A parte mais complicada foi conseguir aquecer toda a peça sem derreter as cordas. A solução foi soldar as cordas dando calor por baixo da peça já que a chapa metálica, que é uma área muito maior, precisava de aquecer mais do que a corda que era composta por fios fininhos.

Com a base terminada, foi a vez de criar as peças da pregadeira. A pregadeira é composta por 3 elementos:

1. O click, que neste modelo é uma chapa comprida enrolada em caracol. É a peça que permite abrir e fechar a pregadeira.

Para fazer o click usei uma tira de chapa a 0,5 mm de espessura com 4×17 mm. A 2 mm de uma ponta dobrei a chapa em L. O lado mais curto foi soldado à parte de trás da pregadeira e a ponta mais comprida (com cerca de 15 mm) é que se enrola em caracol, depois de soldar. Não se dá nenhuma serragem na dobra para não fragilizar o componente.

2. O pé é o nome que se dá ao espigão. É afiado numa ponta e na outra tem uma forma achatada, de cantos redondos. Esta forma pode ser feita de duas maneiras: ou se solda uma pequena chapa por baixo da ponta do fio ou se derrete uma bola na ponta do fio que depois é martelada até a espalmar. Em ambos os casos é preciso arredondar a zona de baixo e é depois feito um furo no meio desta zona mais larga por onde vai passar um rebite. Este furo só se faz depois de soldar o gonzo na peça. O comprimento inicial do pé deve ser ligeiramente maior do que a distância do gonzo ao click. No final lima-se a ponta até formar um bico para espetar na roupa. O pé é o último componente da peça a ser montado.

3. O gonzo: Base em U com um furo onde se prende o pé através de um rebite. Funciona como uma dobradiça.

Dobrei ao meio uma chapa de 0,5 mm com 16×5 mm, deixando espaço entre as duas metades para encaixar a zona espalmada do pé (espigão). Forma-se assim um U com a chapa. Esse U vai ser soldado deitado, com a dobra virada para o click. Antes de soldar é necessário recortar uma curva e bico no topo da forma, como se pode ver na foto, e furar a chapa para passar o rebite. Quanto o gonzo está furado, insere-se o pé, verifica-se se roda bem e marca-se o sàtio do furo. Só nesta fase é que se faz o furo no pé para ter a certeza que fica alinhado com o furo do gonzo.

O rebite era um pequeno fio com 1 mm de espessura, que era também o tamanho dos furos. Devem ficar 1 ou 2 mm de fora de cada lado, quando se insere no gonzo. Para prender o rebite basta apertar com um alicate de ambos os lados.

Com os componentes da pregadeira feitos, virei-me para a cravação da pedra. A pedra escolhida foi um cabochon de goldstone azul. É uma pedra sintética, feita através da suspensão de minerais em vidro num ambiente com pouco oxigénio, mas tem um brilho fantástico.

Fiz uma cravação em virola, com uma chapa de 0,3 mm com altura suficiente para cobrir apenas cerca de um milímetro acima do início de curvatura da pedra. Por dentro soldei um anel feito com fio de 0,8 mm para servir de base à pedra. já tinha feito cravação de virola assente sobre uma chapa mas nunca tinha usado fio como base. Poupa-se imenso metal e a parte de baixo da pedra fica muito mais exposta, com menos trabalho. Acho que vou passar a usar esta técnica de futuro para pedras resistentes. Pedras muito moles ou quebradiças podem necessitar de mais apoio atrás.

Foi necessário cortar o centro da peça e, com uma fresa de diamante, gastar o metal na zona do furo até a virola encaixar perfeitamente. Depois soldei a virola à base e na mesma altura soldei o click e o gonzo nas traseiras.

Antes do polimento escureci a peça com patina, neste caso sulfureto de potássio (também conhecido como fígado de enxofre). Ao polir, a prata recuperou muito do seu brilho mas a patina dá destaque ao entrançado das cordas e um tom mais cinzento a toda a peça, que combinam melhor com a pedra escura.

O polimento demorou cerca de 5 horas. É sempre uma das partes mais demoradas, mesmo em peças simples. Depois de polir foi altura de cravar a pedra e fixar o pé. Como não era possível martelar a cavilha para formar o rebite, o fio que prende o pé ao gonzo foi apertado com um alicate para esmagar as pontas, formando uma cabeça de prego de cada lado.

Como é costume nestas coisas, quando achava que estava tudo pronto, o pé partiu. Não sei se o metal estava demasiado duro e o rebite demasiado apertado ou se foi uma falha do metal. Só sei que tive de gastar o rebite para soltar o pé, soldar, voltar a polir e colocar novo rebite. Pelo menos aprendi a reparar uma pregadeira partida 🙂

Apesar de ter sido feita por mim, esta peça é propriedade do atelier de joalharia, que forneceu todos os materiais utilizados. O objectivo é expor esta e outras peças dos restantes alunos com o tema dos monumentos portugueses, em eventos como a Portojóia. É uma forma de mostrar o trabalho desenvolvido pelos alunos do atelier. Há quem faça um duplicado para si, mas sinceramente eu estou mais interessada em aprender as técnicas do que ficar com todas as peças que produzo. E não há dúvida que uma peça desta complexidade técnica ensina muito.

English:

My jewellery classes are going well. It’s a shame that they’re only 4 hours a week because it takes so long to finish each piece at this pace, but I enjoy being there. here’s a great atmosphere and it’s good for me to interact with other adult humans once in a while, especially with people who share the same interests. Being at the jewellery studio is so different than being in a regular school because no one feels they’re forced to be there. Sometimes it’s frustrating, when things go wrong with the work or you need to do more repetitive tasks, but the overall complaint level is surprisingly low. Our teacher is greatly responsible for this positive atmosphere because he’s a very good humoured person who makes a great effort to keep people motivated.

I finally finished the second piece in the course. This time it’s a pin, or brooch, with a theme selected by the teacher: Portuguese Monuments. I chose the Convent of Christ in Tomar. It was built over a long period of time so it has elements from several different styles, from Romanesque, Gothic, Manueline (Portugal’s late gothic style, known for it’s stone knotwork) and into the Renaissance period.

At first I was going to base the design on a spiral staircase but opted for a window instead. Not the famous Manueline window, which for me would have been way too obvious and make the piece a little too busy, but a smaller, round window above it, that reminded me of a camera shutter mechanism and also followed the spiral pattern similar to the staircase I had chosen initially.

I didn’t want to make it too obvious so I used the photograph’s perspective distortion to make an oval rather than round piece, with the window’s opening, where the stone would sit, placed off center.

Once the design was set, I used a jeweller’s saw to cut all the parts out of 0,5 mm sterling silver sheet. The plan was to solder the edge of each one on top of the previous, like steps. I drew numbers on all the parts with a needle, so I wouldn’t mess up the order they should be assembled in. An obvious step but one that we sometimes forget by trying to rush ahead.

All the spiral parts were domed in a dapping cube (by hammering the dapping punch over the metal until it conforms to the curve) and then I assembled the shape over plasticine until I was happy with the overlap. This is a great technique to secure all the bits in place when you have an intricate design like this one.

It’s really difficult to solder a piece of this complexity bit by bit and make everything line up correctly, so I poured plaster over all the pieces assembled in the plasticine. This keeps everything in place.

Once the plaster dried, I removed it from the plasticine, and the metal remained attached to the plaster, allowing me to solder while keeping all the metal parts in place. I soldered all the tips together. I could solder everything at once, but if I did that there was no room for error, and being a newbie still, it was safer to solder the tips and then make sure everything else was still in place before running the solder over all the joints.

Once the parts were all attached to each other I removed the plaster. I broke off the larger pieces and then placed the rest in a container full of water to help remove the rest. The plaster show go in the trash. Don’t poor it down the drain because it can clog up your pipes.

After soldering all the “steps” in the spiral, it was time to make the walls. The walls add height to a piece and make it solid and finished instead of a flimsy piece of sheet metal. It’s particularly important for brooches and pendants because it makes them stand up from the body or clothing.

Walls don’t need to be very thick, but this was a large piece so I settled on 1 mm thickness. I made 2 mm square wire in the rolling mill and the squashed it until it was 1 mm thick. I could have made it all one piece but I wanted the corners in each plate to stand out so I cut portions as I went, curved and filed them to fit the plate.

Soldering the walls wasn’t easy. I had to stabilise a thin strip over the very edge of a curved shape and it kept slipping out of place.

It was a long and frustrating process. I used a pumice pan to support the piece and tied the wall with iron binding wire but it would still move around. The best option was to hold the wall with third hand tweezers but even then it would slip out of place at the worst possible time, making it really hard to get back into place. It took forever!

It was also difficult to make the walls conform perfectly to the curve: each part of the spiral had a slightly different curvature and I had to make sure there were no gaps. It turns out I wasn’t using enough solder, but even still, it was quite a headache getting everything to fit properly. Solder should never be used to plug gaps anyway because it will move the next time you heat the piece and the gap will should up again.

The other problem I faced was the fact that this was my first large piece and it took forever to heat up enough for the solder to flow. I covered previous joints with white correction fluid but the solder would still move on occasion or it wouldn’t run in the direction I wanted it to.

When I managed to solder everything into place I had to do a bit of cleanup by filing the edges where the curved sheet metal connects with the wall, to round up the shape and make it all fit together. This was done now because I still had to solder other elements on top of the shape.

The next step was twisting two 0,7 mm wires together to make “rope”, a typical element of Manueline architecture. I had done this sort of thing before but I’d used industrially made wire that was already annealed. This time I had to use a drawplate to get my wire to the desired thickness and it’s not easy to uniformly anneal wire with a torch. Some bits will usually get softer than others, which makes it hard to twist the wires evenly.

To solve this issue, my teacher heated the metal with a torch as I was twisting the wire, whenever we felt that a section wasn’t cooperating. It can be done by a single person but you have to play close attention to the process and where you point the torch so as not to risk melting the wire or burning something.

I cut all the “rope” sections, soldered one end to the brooch and then molded it along the curved edge before soldering the other end. Once again, keeping the twisted wires in place wasn’t easy but much simpler than the walls. The hardest part was heating the whole piece without melting the twisted wires. To prevent such a disaster I heated from underneath.

The body of the brooch was completed so I focused on the construction of the pin mechanism. The pin is made up of three components:

1. The catch – in this case it’s made from a long strip curled into a spiral. It’s what keeps the brooch closed.

To make the catch I used a 4×17 mm strip of 0,5 sterling silver. At 2mm from one end I bent it to form an L shape. The shorter end was soldered onto the back of the brooch and the longer end (15 mm long) was then curled into a spiral.

2. The pin stem – a long wire with one sharp end and a flat end with a hole in the middle (top of the picture above). The flat end is attached to the joint by a rivet and the sharp end goes through the clothing to keep it in place.

I made the pin out of 1 mm wire. It can be made out of thicker wire but the thicker it is, the more likely it can damage the clothes.

The flat end can be achieved by hammering and then drilling a hole though it or you can solder a small square of silver sheet and round the corners. I chose to hammer the wire. This flat area will need to be drilled but only after the joint has been soldered into place.

The length of the pin depends on how far apart the catch and the joint are placed. I made it longer than I needed to make sure there would be enough to go through the catch. Only after everything was in place did I cut it to size and file the sharp end.

3. The joint – a U-shaped hinge that connects to the pin stem.

I bent a 16×5 mm strip of 0,5 mm sterling silver sheet in half, leaving enough room in the middle so the pin stem could slot into it. The U shape is soldered on its side, with the closed portion facing the catch. I cut one side of the U shape according to the design in the photo (front and back). Drilled a hole in the middle of the round area and soldered it onto the brooch, opposite the catch. Then I inserted the pin stem, checked the shape and marked where I should drill the hole so it would line up with the one on the joint. Only then did I drill the hole in the pin stem.

I attached the pin with a rivet. The rivet was made out of a small portion of 1 mm wire (the same size as the hole). There should be 1 or 2 mm of wire sticking out of each end when inserted. To close it I simply squeezed it with pliers.

This part is done only at the very end, after all the soldering and polishing is done.

Finally I worked on the stone setting. I used a round blue goldstone cabochon. I made a bezel out of 0,3 mm sterling silver sheet, only tall enough to reach about 1 mm beyond the part of the stone that starts to curve inward.

I soldered a jump ring inside the bezel, at the base, to support the stone. This uses less metal than a backplate and allows light to shine through. If the stone isn’t too fragile it’s a good option.

In order to accommodate the bezel, I had to cut out a hole in the brooch. I used a diamond burr to open the orifice until the bezel fit perfectly. I soldered the bezel into the brooch first and then added the catch and joint to the back.

Before polishing, I used Liver of Sulfur to oxidize the piece. When I polished, the silver regained it’s shine but the recessed areas remained dark, adding depth to the design. I think it also matches the dark stone as well.

Polishing took about 5 hours, mostly because I’m not that experienced at it yet. It is always time consuming, though, even for more experienced people.

After polishing I set the stone and finally added the pin stem, which broke. I don’t know if it was too hardened or too tight, but it didn’t make it. When something goes wrong it’s usually at the very end. Fortunately, it was an easy fix. I filed the rivet head on one side so I could remove it, made a new pin stem, polished it and attached it with a new rivet. At least I learned how to fix a broken pin.

Even though I made this piece, it belongs to the jewellery studio and was made with materials supplied by my teacher. Every two years the students make an exhibit piece that remains in the studio for show. Each collection has a theme and will be shown in several venues over the next couple of years in representation of the school. Some students make a duplicate for themselves but i’m more interested in learning the techniques than keeping everything I make, so I didn’t. I did learn a lot, though.