O novo exercício do curso avançado de joalharia consistiu em fazer uma peça com bata com luz.
A bata é o nome que se dá à chapa que dá altura às peças. É a “parede” que transforma uma chapa fininha numa peça tridimensional. No projecto que escolhi, a bata é também a base da pedra. Bata com luz significa apenas que é uma bata com um desenho que permite a passagem da luz, ou seja, não é uma “parede” sólida.
A “pedra” que escolhi para esta peça foi um fragmento de concha chamado abalone. É uma espécie de madrepérola com umas cores lindas. O fragmento de abalone foi-me dada pela minha tia Elisabete e achei que merecia uma peça especial. Também escolhi esta “pedra” porque tenho tendência para projectos muito geométricos e queria explorar um desenho algo mais irregular. Cada um tem coisas boas e más. Por exemplo, é mais fácil fazer uma cravação para uma pedra regular mas muito mais complicado manter o rigor que um desenho geométrico requer. O design foi inspirado numa peça de Stacy Perry (hodgepodgery) mas penso que o resultado é bem diferente, graças à tridimensionalidade criada pela bata.
A madrepérola tinha uma base muito irregular, em que um lado era muito mais alto do que o outro. A zona mais espessa era até alta demais para ficar bem na peça, por isso limei a base até chegar a uma medida que permitia ter uma base mais estável e direita, e também ter uma altura mais fácil de integrar na peça.
Comecei então por moldar um fio quadrado de 1 mm à forma da pedra, para fazer a base da cravação. Isto implicou moldar o fio tanto na vertical como na horizontal, para acompanhar a diferença de alturas da base. Com um segundo fio quadrado, fiz o mesmo desenho mas desta vez todo plano. A bata com luz ficaria entre estes dois fios quadrados.
Na zona mais alta da pedra, entre a base plana e o suporte da pedra, inseri uns fios rectangulares para criar alguma distância entre os dois fios quadrados e deixar entrar alguma luz. Esta é a forma mais simples de fazer uma bata com luz, e se a base da pedra fosse regular, poderia ter feito isto a toda a volta.
Como tinha uma altura muito grande no outro lado, e porque o projecto incluía uns elementos decorativos triangulares, resolvi fazer a bata também com triângulos. Para tal, usei fio quadrado com 0,8mm no qual fiz um pequeno cortes para o dobrar ao meio, formando assim duas faces do triângulo. Estas pecinhas foram limadas até caber entre as bases da pedra e soldadas.
Depois fiz o segundo elemento do projecto, uma espécie de ponte curva, com uma chapa com 1mm de espessura e os mesmos triângulos da bata entre a base e a chapa curva do topo.
Em cima dessa “ponte” soldei uns pauzinhos meramente decorativos, para dar mais textura à peça, e por baixo da “ponte” soldei uns fios para fazerem a ligação entre os dois elementos – a cravação da pedra e a “ponte”. Um desses fios de ligação prolonga-se para além da cravação para servir de suporte a uma pequena pérolas. Esse suporte consistiu em criar uma virola com o tamanho da pérola com um espigão soldado no meio, uma vez que a pérola era de meio furo e seria colada no final.
Soldei os grampos que iriam segurar a madrepérola à estrutura da mesma, tendo o cuidado de não tapar o desenho triangular da bata, e depois cobri toda a estrutura da peça com gesso para poder soldar as ligações em segurança, sem os elementos se mexerem.
Por fim foi a vez de fazer o alfinete da pregadeira. Comecei pelo clique, que é a parte do fecho. Em vez de um caracol simples, como na primeira pregadeira, desta vez fiz um fecho rotativo.
Comecei por fazer um canuvão (tubo) ao qual cortei uma pequena secção. Soldei uma chapa para servir de base ao fecho e cortei duas linhas paralelas no lado oposto da peça, para entrar o espigão rotativo.
Depois tornei o resto do canuvão um pouco mais fino, até caber dentro da peça do fecho, e soldei o espigão. Inseri o espigão na ranhura do fecho e soldei uma peça quadrada para servir de “pega”. Foi necessário serrar um quadrado no centro dessa chapa quadrada que tinha de ficar rente ao espigão. É um pormenor mas algo que pode demorar uma eternidade a fazer porque é muito fácil alargar de mais e assim ter de fazer outro (que foi o que aconteceu da primeira vez. Quando essa chapinha estava no sítio, serrei o resto do canevão que estava a mais.
O pé e o gonzo da pregadeira foram feitos da mesma forma da anterior pregadeira. Fiz também uma argola extra para a peça poder igualmente ser usada como pendente.
Soldei tudo à parte inferior da peça e foi altura de passar aos acabamentos – limar, lixar, oxidar e polir. Para oxidar apenas parte da peça, a melhor técnica é aquecer ligeiramente o metal com o maçarico e depois aplicar o óxido com um pincel. Isso permite uma aplicação bastante precisa, sem ser preciso gastar tanto com o polimento para ter o resultado pretendido.
Por fim cravei a pedra, colei as pérolas nos espigões e cravei também o rebite do pé da pregadeira. E pronto, mais uma peça terminada. Esta demorou bastante tempo porque tinha muitos detalhes técnicos e muitos elementos que tinham de encaixar perfeitamente.
Abalone shell brooch – pierced walls
The next exercise in the advanced jewellery course was to make a brooch with a pierced wall.
The wall adds height to a piece, lifts it away from the body and transforms a thin sheet of metal into a tridimensional item. A pierced wall simply means that there are openings all around the piece that allow light to shine through. In the chosen design, the wall is also the base for the stone setting.
I chose an abalone fragment. It’s a shell similar to mother of pearl but with very bright, beautiful colours. This abalone fragment was given to me by my aunt Elisabete and I felt it deserved to belong to a special piece. I also chose it because I have a tendency for geometric designs and I wanted to see what I could do with a more irregular item. Each has good and bad things. It’s easier to make a setting for a regular gemstone, for instance, but a lot harder to be perfect when cutting out a geometric design.
This particular design was inspired by a Stacy Perry piece (hodgepodgery) but I believe the end result is quite different, thanks to the dimension added by the pierced wall.
The abalone fragment had a very irregular base and one side was much higher than the other. The taller side was too tall to fit well, so I filed it down until there was enough flat base for it to sit straight and steady.
I started with the setting, by shaping a 1mm square wire until it fit the underside of the abalone fragment. The wire also followed all the ups and downs of the base. With another square wire I duplicated the shape but this time made it flat. The pierced wall would be assembled between these two wires.
On the side where the abalone was highest, both base wires nearly touch. I simply added some rectangular wires at regular intervals, like pillars, between both square base wires to create some height and let some light in. This is the simplest way to make a pierced wall. With a regular gemstone it’s possible to do this all around. The look of the wall can be changed simply by changing the height of the pillars.
The opening on the opposite side was quite large so simple pillars would be too bland. Since the project included some triangular decorations, I decided to also fill the wall with triangles. I used 0,8mm (20 AWG) square wire, cut it into small bits, cut a small notch in the middle of each one and bent them in half to make two sides of the triangles. I filed the ends until they fit perfectly between both base wires and soldered them one by one.
After that I made the second element in the design, a sort of curved bridge that would sit next to the stone. I used rectangular wire 1 mm (18 AWG) thick by 25 mm wide, shaped in a soft curve. There were two similar curved shapes (top and bottom) with more triangles in between.
On top of this “bridge”, I soldered small rectangular wires also following the triangular motif. These were purely decorative, to add texture. Underneath the “bridge”, I soldered three parallel square wires that would connect it with the stone setting. One of these wires stretches beyond the setting to support a small pearl and the other two became prongs that hold the abalone shell in place. The pearl setting is made from a small bezel with a prong in the middle. The pearl was glued to the prong with epoxy glue.
I soldered another triangle on the inside of the stone setting to add an extra prong and also bent and soldered the two other prongs to the side of the setting. I used plaster to hold all the elements in place while soldering.
Once the main design elements were done, I worked on the pin mechanism. This time I did a rotating catch.
I made a tube, cut a small section, soldered a small piece of rectangular wire to the side of the tube, to make a base, and cut a strip off the opposite side (the top), This strip will accommodate the slider that allows for the catch to open and close.
I ran the remaining tube through a draw plate to make it small enough to fit the previous tube and soldered a bit of square wire to it, to make the slider. I inserted this tube with the slider, into the larger one (I had to open up the larger tube to make this one fit) and then soldered a small square on the tip of the slider. I drilled a hole in the centre of the square so it would fit onto the wire and be more secure.
Since the slider was made from square wire, I had to file this hole square as well. It took forever to make it perfect. I think round wire for the slider is a much simpler option in future. Once everything was in place, I sawed off all the excess tube, which I had cut a bit larger than necessary. I always refer to start larger and then cut it down to size. More room for error.
The pin stem and the joint were made the same way as the previous brooch. I added a little loop on the back so the brooch could also be worn as a pendant.
Once everything was soldered in place it was time to file, sand, add patina and polish. I only wanted to add patina to certain areas of the brooch so I heat it up for a few seconds and painted the liver of sulphur onto the bits I wanted to darken with a small paintbrush. It saves time when polishing if you don´t need to remove so much of the patina in unwanted areas.
Finally I set the main stone – the abalone fragment – and glued the pearls onto their spikes. I also attached the pin stem with a rivet and I was done. This piece took a long time to complete because there were a lot of small elements that had to fit just right.
As minhas aulas de joalharia continuam a correr bem. É pena que sejam só quatro horas por semana porque demoro imenso tempo a terminar uma peça, mas gosto muito de lá estar. O ambiente é óptimo e faz-me bem interagir com outros humanos ocasionalmente, especialmente com pessoas que partilham os mesmos interesses. Estar no atelier é completamente diferente de andar na escola porque ninguém está lá por obrigação. Há sempre alturas mais frustrantes, em que as coisas correm mal ou em que é preciso fazer uma tarefa mais monótona ou complicada, mas o nàvel de queixume geral é surpreendentemente baixo. Grande parte disso deve-se ao professor que é extremamente positivo e faz um esforço enorme por manter toda a gente motivada.
Terminei finalmente a segunda peça do curso. Foi uma pregadeira, com tema lançado pelo professor: monumentos portugueses. Escolhi o Convento de Cristo em Tomar. Inicialmente pensei basear-me numa escada em caracol mas posteriormente optei por uma janela. Não a famosa janela Manuelina mas uma outra, redonda, que se situa por cima dessa. O aspecto da janela faz-me lembrar o obturador de uma máquina fotográfica e tem o mesmo desenho em espiral da escada que eu tinha escolhido inicialmente.
Janela que inspirou o design da peça
Para não criar algo terrivelmente óbvio, acabei por usar a distorção da perspectiva causada pela foto para criar uma peça oval em vez de redonda, com a abertura da janela, onde iria assentar uma pedra, descentrada.
estudos para o projecto
Estabelecido o desenho da peça, foi necessário cortar as várias chapas que iriam ser soldadas, sobrepostas.
desenho das chapas a cortar
As chapas foram depois embutidas para ficarem com uma curvatura e montadas temporariamente numa base de plasticina até se obter o encaixe perfeito entre todas as peças.
Como é praticamente impossível soldar uma peça desta complexidade aos bocadinhos, esta montagem temporária foi coberta com gesso para manter todas as placas no sítio. A peça foi retirada da plasticina, ficando presa ao gesso. Esta montagem permitiu fazer os primeiros apontamentos de solda.
Quando as peças estavam todas soldadas numa ponta, foi possível retirar o gesso e proceder ao resto da soldadura.
Quando estava tudo finalmente montado e soldado, foi a vez de fazer a bata. A bata é uma tira metálica que serve para dar altura à peça. É particularmente importante em peças como pendentes ou pregadeiras, para que estas ganhem algum destaque em vez de ficarem planas junto ao corpo.
As batas não têm de ser muito grossas mas como a peça era grande, ficou com cerca de um milàmetro de espessura. Depois de laminar a chapa com a altura e espessura correctas, cortei secções do tamanho de cada uma das placas do topo para manter a saliência dos cantos. Soldar a bata foi complicado porque esta não tinha apoio. Estabilizar uma peça com um centàmetro de largura sobre uma superfàcie curva, tendo a certeza que fica alinhada com o limite da chapa de base e não cai durante o processo é um verdadeiro quebra-cabeças. Assentei a peça numa base de gravilha (areia térmica) para dar estabilidade e prendi a bata à peça com fio de ferro mas, como a base era redonda, o fio tinha tendência para escorregar.
Foi um processo longo e algo frustrante porque ocasionalmente a bata mexia na pior altura possàvel e era difàcil voltar a prendê-la na posição correcta, já para não falar na complicação que foi preencher todas as juntas de solda sem ficar nenhum furinho. Como a curvatura das diversas peças era diferente, foi complicado ajustar perfeitamente a curvatura da bata, o que criava pequenos espaços aqui e ali. A solda não serve para preencher espaços pelo que foi preciso alguma ginástica para completar o processo com um acabamento perfeito. O outro problema técnico é que a peça tinha muito metal, o que quer dizer que é difàcil de aquecer uniformemente. Isso implica que a solda nem sempre corria na direcção desejada e era muito fácil derreter soldaduras anteriores. Usei e abusei do corrector e mesmo assim foi necessário acrescentar solda nalguns pontos onde a solda anterior teimava em fugir. Foi de facto um puzzle complicado de montar.
Quando estava tudo finalmente montado, foi necessário fazer um acabamento prévio. Limei e lixei as arestas e arredondei a peça para a junção da bata com a chapa ser menos evidente e a peça ter um aspecto mais coerente por inteiro. Este tipo de acabamento só se costuma fazer no fim mas como precisava de soldar mais elementos em cima desta forma base, precisei de o fazer agora.
A fase seguinte consistiu em enrolar dois fios de prata de 0,7 mm para criar as cordas, elemento tàpico da arquitectura Manuelina. Já tinha feito cordas de dois fios enrolados, mas sempre com fio comprado já na espessura certa e recozido. Neste caso tive the passar o fio na fieira para o por com a espessura indicada e recozer o fio com o maçarico. Recozer fio uniformemente com maçarico é complicado. O resultado é muitas vezes irregular, o que faz com que o fio não enrole todo da mesma forma. Para resolver esse problema, tive a ajuda do professor Paulo que foi aquecendo os fios com o maçarico, enquanto eu enrolava. Acredito que dê para fazer isto só com uma pessoa mas é muito mais complicado e uma pequena distracção pode derreter o fio todo.
Depois de cortar as secções de “corda” à medida, fiz um apontamento de solda sobre a bata e depois moldei a corda à forma das chapas antes de soldar a outra ponta. Mais uma vez, manter as pequenas cordas no sàtio certo não foi fácil, mas menos complicado do que soldar a bata. A parte mais complicada foi conseguir aquecer toda a peça sem derreter as cordas. A solução foi soldar as cordas dando calor por baixo da peça já que a chapa metálica, que é uma área muito maior, precisava de aquecer mais do que a corda que era composta por fios fininhos.
Com a base terminada, foi a vez de criar as peças da pregadeira. A pregadeira é composta por 3 elementos:
1. O click, que neste modelo é uma chapa comprida enrolada em caracol. É a peça que permite abrir e fechar a pregadeira.
Para fazer o click usei uma tira de chapa a 0,5 mm de espessura com 4×17 mm. A 2 mm de uma ponta dobrei a chapa em L. O lado mais curto foi soldado à parte de trás da pregadeira e a ponta mais comprida (com cerca de 15 mm) é que se enrola em caracol, depois de soldar. Não se dá nenhuma serragem na dobra para não fragilizar o componente.
2. O pé é o nome que se dá ao espigão. É afiado numa ponta e na outra tem uma forma achatada, de cantos redondos. Esta forma pode ser feita de duas maneiras: ou se solda uma pequena chapa por baixo da ponta do fio ou se derrete uma bola na ponta do fio que depois é martelada até a espalmar. Em ambos os casos é preciso arredondar a zona de baixo e é depois feito um furo no meio desta zona mais larga por onde vai passar um rebite. Este furo só se faz depois de soldar o gonzo na peça. O comprimento inicial do pé deve ser ligeiramente maior do que a distância do gonzo ao click. No final lima-se a ponta até formar um bico para espetar na roupa. O pé é o último componente da peça a ser montado.
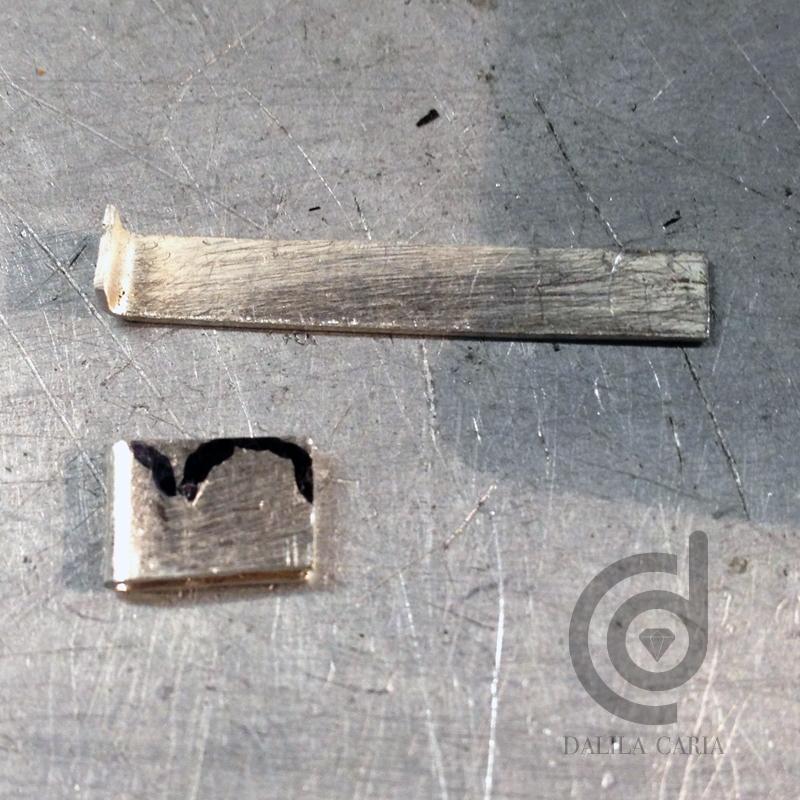
3. O gonzo: Base em U com um furo onde se prende o pé através de um rebite. Funciona como uma dobradiça.
Dobrei ao meio uma chapa de 0,5 mm com 16×5 mm, deixando espaço entre as duas metades para encaixar a zona espalmada do pé (espigão). Forma-se assim um U com a chapa. Esse U vai ser soldado deitado, com a dobra virada para o click. Antes de soldar é necessário recortar uma curva e bico no topo da forma, como se pode ver na foto, e furar a chapa para passar o rebite. Quanto o gonzo está furado, insere-se o pé, verifica-se se roda bem e marca-se o sàtio do furo. Só nesta fase é que se faz o furo no pé para ter a certeza que fica alinhado com o furo do gonzo.
O rebite era um pequeno fio com 1 mm de espessura, que era também o tamanho dos furos. Devem ficar 1 ou 2 mm de fora de cada lado, quando se insere no gonzo. Para prender o rebite basta apertar com um alicate de ambos os lados.
Com os componentes da pregadeira feitos, virei-me para a cravação da pedra. A pedra escolhida foi um cabochon de goldstone azul. É uma pedra sintética, feita através da suspensão de minerais em vidro num ambiente com pouco oxigénio, mas tem um brilho fantástico.
Fiz uma cravação em virola, com uma chapa de 0,3 mm com altura suficiente para cobrir apenas cerca de um milímetro acima do início de curvatura da pedra. Por dentro soldei um anel feito com fio de 0,8 mm para servir de base à pedra. já tinha feito cravação de virola assente sobre uma chapa mas nunca tinha usado fio como base. Poupa-se imenso metal e a parte de baixo da pedra fica muito mais exposta, com menos trabalho. Acho que vou passar a usar esta técnica de futuro para pedras resistentes. Pedras muito moles ou quebradiças podem necessitar de mais apoio atrás.
Foi necessário cortar o centro da peça e, com uma fresa de diamante, gastar o metal na zona do furo até a virola encaixar perfeitamente. Depois soldei a virola à base e na mesma altura soldei o click e o gonzo nas traseiras.
Antes do polimento escureci a peça com patina, neste caso sulfureto de potássio (também conhecido como fígado de enxofre). Ao polir, a prata recuperou muito do seu brilho mas a patina dá destaque ao entrançado das cordas e um tom mais cinzento a toda a peça, que combinam melhor com a pedra escura.
O polimento demorou cerca de 5 horas. É sempre uma das partes mais demoradas, mesmo em peças simples. Depois de polir foi altura de cravar a pedra e fixar o pé. Como não era possível martelar a cavilha para formar o rebite, o fio que prende o pé ao gonzo foi apertado com um alicate para esmagar as pontas, formando uma cabeça de prego de cada lado.
Como é costume nestas coisas, quando achava que estava tudo pronto, o pé partiu. Não sei se o metal estava demasiado duro e o rebite demasiado apertado ou se foi uma falha do metal. Só sei que tive de gastar o rebite para soltar o pé, soldar, voltar a polir e colocar novo rebite. Pelo menos aprendi a reparar uma pregadeira partida 🙂
Apesar de ter sido feita por mim, esta peça é propriedade do atelier de joalharia, que forneceu todos os materiais utilizados. O objectivo é expor esta e outras peças dos restantes alunos com o tema dos monumentos portugueses, em eventos como a Portojóia. É uma forma de mostrar o trabalho desenvolvido pelos alunos do atelier. Há quem faça um duplicado para si, mas sinceramente eu estou mais interessada em aprender as técnicas do que ficar com todas as peças que produzo. E não há dúvida que uma peça desta complexidade técnica ensina muito.
English:
My jewellery classes are going well. It’s a shame that they’re only 4 hours a week because it takes so long to finish each piece at this pace, but I enjoy being there. here’s a great atmosphere and it’s good for me to interact with other adult humans once in a while, especially with people who share the same interests. Being at the jewellery studio is so different than being in a regular school because no one feels they’re forced to be there. Sometimes it’s frustrating, when things go wrong with the work or you need to do more repetitive tasks, but the overall complaint level is surprisingly low. Our teacher is greatly responsible for this positive atmosphere because he’s a very good humoured person who makes a great effort to keep people motivated.
I finally finished the second piece in the course. This time it’s a pin, or brooch, with a theme selected by the teacher: Portuguese Monuments. I chose the Convent of Christ in Tomar. It was built over a long period of time so it has elements from several different styles, from Romanesque, Gothic, Manueline (Portugal’s late gothic style, known for it’s stone knotwork) and into the Renaissance period.
At first I was going to base the design on a spiral staircase but opted for a window instead. Not the famous Manueline window, which for me would have been way too obvious and make the piece a little too busy, but a smaller, round window above it, that reminded me of a camera shutter mechanism and also followed the spiral pattern similar to the staircase I had chosen initially.
I didn’t want to make it too obvious so I used the photograph’s perspective distortion to make an oval rather than round piece, with the window’s opening, where the stone would sit, placed off center.
Once the design was set, I used a jeweller’s saw to cut all the parts out of 0,5 mm sterling silver sheet. The plan was to solder the edge of each one on top of the previous, like steps. I drew numbers on all the parts with a needle, so I wouldn’t mess up the order they should be assembled in. An obvious step but one that we sometimes forget by trying to rush ahead.
All the spiral parts were domed in a dapping cube (by hammering the dapping punch over the metal until it conforms to the curve) and then I assembled the shape over plasticine until I was happy with the overlap. This is a great technique to secure all the bits in place when you have an intricate design like this one.
It’s really difficult to solder a piece of this complexity bit by bit and make everything line up correctly, so I poured plaster over all the pieces assembled in the plasticine. This keeps everything in place.
Once the plaster dried, I removed it from the plasticine, and the metal remained attached to the plaster, allowing me to solder while keeping all the metal parts in place. I soldered all the tips together. I could solder everything at once, but if I did that there was no room for error, and being a newbie still, it was safer to solder the tips and then make sure everything else was still in place before running the solder over all the joints.
Once the parts were all attached to each other I removed the plaster. I broke off the larger pieces and then placed the rest in a container full of water to help remove the rest. The plaster show go in the trash. Don’t poor it down the drain because it can clog up your pipes.
After soldering all the “steps” in the spiral, it was time to make the walls. The walls add height to a piece and make it solid and finished instead of a flimsy piece of sheet metal. It’s particularly important for brooches and pendants because it makes them stand up from the body or clothing.
Walls don’t need to be very thick, but this was a large piece so I settled on 1 mm thickness. I made 2 mm square wire in the rolling mill and the squashed it until it was 1 mm thick. I could have made it all one piece but I wanted the corners in each plate to stand out so I cut portions as I went, curved and filed them to fit the plate.
Soldering the walls wasn’t easy. I had to stabilise a thin strip over the very edge of a curved shape and it kept slipping out of place.
It was a long and frustrating process. I used a pumice pan to support the piece and tied the wall with iron binding wire but it would still move around. The best option was to hold the wall with third hand tweezers but even then it would slip out of place at the worst possible time, making it really hard to get back into place. It took forever!
It was also difficult to make the walls conform perfectly to the curve: each part of the spiral had a slightly different curvature and I had to make sure there were no gaps. It turns out I wasn’t using enough solder, but even still, it was quite a headache getting everything to fit properly. Solder should never be used to plug gaps anyway because it will move the next time you heat the piece and the gap will should up again.
The other problem I faced was the fact that this was my first large piece and it took forever to heat up enough for the solder to flow. I covered previous joints with white correction fluid but the solder would still move on occasion or it wouldn’t run in the direction I wanted it to.
When I managed to solder everything into place I had to do a bit of cleanup by filing the edges where the curved sheet metal connects with the wall, to round up the shape and make it all fit together. This was done now because I still had to solder other elements on top of the shape.
The next step was twisting two 0,7 mm wires together to make “rope”, a typical element of Manueline architecture. I had done this sort of thing before but I’d used industrially made wire that was already annealed. This time I had to use a drawplate to get my wire to the desired thickness and it’s not easy to uniformly anneal wire with a torch. Some bits will usually get softer than others, which makes it hard to twist the wires evenly.
To solve this issue, my teacher heated the metal with a torch as I was twisting the wire, whenever we felt that a section wasn’t cooperating. It can be done by a single person but you have to play close attention to the process and where you point the torch so as not to risk melting the wire or burning something.
I cut all the “rope” sections, soldered one end to the brooch and then molded it along the curved edge before soldering the other end. Once again, keeping the twisted wires in place wasn’t easy but much simpler than the walls. The hardest part was heating the whole piece without melting the twisted wires. To prevent such a disaster I heated from underneath.
The body of the brooch was completed so I focused on the construction of the pin mechanism. The pin is made up of three components:
1. The catch – in this case it’s made from a long strip curled into a spiral. It’s what keeps the brooch closed.
To make the catch I used a 4×17 mm strip of 0,5 sterling silver. At 2mm from one end I bent it to form an L shape. The shorter end was soldered onto the back of the brooch and the longer end (15 mm long) was then curled into a spiral.
2. The pin stem – a long wire with one sharp end and a flat end with a hole in the middle (top of the picture above). The flat end is attached to the joint by a rivet and the sharp end goes through the clothing to keep it in place.
I made the pin out of 1 mm wire. It can be made out of thicker wire but the thicker it is, the more likely it can damage the clothes.
The flat end can be achieved by hammering and then drilling a hole though it or you can solder a small square of silver sheet and round the corners. I chose to hammer the wire. This flat area will need to be drilled but only after the joint has been soldered into place.
The length of the pin depends on how far apart the catch and the joint are placed. I made it longer than I needed to make sure there would be enough to go through the catch. Only after everything was in place did I cut it to size and file the sharp end.
3. The joint – a U-shaped hinge that connects to the pin stem.
I bent a 16×5 mm strip of 0,5 mm sterling silver sheet in half, leaving enough room in the middle so the pin stem could slot into it. The U shape is soldered on its side, with the closed portion facing the catch. I cut one side of the U shape according to the design in the photo (front and back). Drilled a hole in the middle of the round area and soldered it onto the brooch, opposite the catch. Then I inserted the pin stem, checked the shape and marked where I should drill the hole so it would line up with the one on the joint. Only then did I drill the hole in the pin stem.
I attached the pin with a rivet. The rivet was made out of a small portion of 1 mm wire (the same size as the hole). There should be 1 or 2 mm of wire sticking out of each end when inserted. To close it I simply squeezed it with pliers.
This part is done only at the very end, after all the soldering and polishing is done.
Finally I worked on the stone setting. I used a round blue goldstone cabochon. I made a bezel out of 0,3 mm sterling silver sheet, only tall enough to reach about 1 mm beyond the part of the stone that starts to curve inward.
I soldered a jump ring inside the bezel, at the base, to support the stone. This uses less metal than a backplate and allows light to shine through. If the stone isn’t too fragile it’s a good option.
In order to accommodate the bezel, I had to cut out a hole in the brooch. I used a diamond burr to open the orifice until the bezel fit perfectly. I soldered the bezel into the brooch first and then added the catch and joint to the back.
Before polishing, I used Liver of Sulfur to oxidize the piece. When I polished, the silver regained it’s shine but the recessed areas remained dark, adding depth to the design. I think it also matches the dark stone as well.
Polishing took about 5 hours, mostly because I’m not that experienced at it yet. It is always time consuming, though, even for more experienced people.
After polishing I set the stone and finally added the pin stem, which broke. I don’t know if it was too hardened or too tight, but it didn’t make it. When something goes wrong it’s usually at the very end. Fortunately, it was an easy fix. I filed the rivet head on one side so I could remove it, made a new pin stem, polished it and attached it with a new rivet. At least I learned how to fix a broken pin.
Even though I made this piece, it belongs to the jewellery studio and was made with materials supplied by my teacher. Every two years the students make an exhibit piece that remains in the studio for show. Each collection has a theme and will be shown in several venues over the next couple of years in representation of the school. Some students make a duplicate for themselves but i’m more interested in learning the techniques than keeping everything I make, so I didn’t. I did learn a lot, though.