Arquivo da Categoria: Artesanato

Bijutaria em resina – Resin Jewellery

Há algum tempo pediram-me para reparar uma pregadeira à  qual faltava um vidrinho facetado. Pela forma e cor do vidro, percebi que ia ser impossível encontrar um igual pelo que a única opção era fazer um para substituir. Fiz um molde em silicone e depois de considerar e descartar a opção de fazer uma réplica em Fimo, decidi que a resina era o material mais adequado.

Nunca tinha usado resina mas adoro experimentar novas técnicas e materiais por isso era um desafio excitante. Informei-me em grande detalhe sobre os problemas que podem ocorrer e como resolvê-los e as medidas de segurança a tomar. Comprei os materiais necessários e fiz uma pequena dose para começar. A primeira experiência correu bem e fui ganhando mais confiança e entusiasmo pelas possibilidades do material.

Aqui estão algumas das peças que fiz até agora. Não vou por à  venda na loja online porque sinceramente estou a considerar acabar com ela e lidar directamente com clientes por mail ou pelo facebook. A necessidade de efectuar registo, apesar de ser um passo necessário porque preciso de ter a morada de envio da pessoa, causa alguma confusão porque algumas pessoas acham que o registo envia automaticamente a encomenda e não fazem check-out. Queria simplificar o processo e torná-lo mais personalizado.

– I had a request some time ago to replace a faceted glass cab on a brooch. The stone had such a specific size and cut that i knew I wouldn’t be able to purchase another to match. While considering alternatives I first thought about polymer clay, simply because I’m familiar with it and it would be easy to replicate the stone. With that in mind I made a silicon mold out of one of the matching cabs but it was obvious from the start that polymer clay wouldn’t work because it’s opaque. I could match shape and color but it would always lack transparency.

That’s when I thought about resin. I’d never worked with resin before but I’d seen it on sale at my craft store and I’m always up for a new technique so I decided to try.

Since I needed to mix a larger amount than the one required for one tiny little cab, I planned what else I might want to do with the resin before taking the plunge. I bought some cupcake silicon moulds and made a few more of my own. I saw a lot of tutorials on YouTube and read up on safety and what could go wrong before mixing a small batch of resin (30 ml out of the 150 ml package). I experimented with adding color by using soft pastels and ballpoint pen ink and trying out all the moulds I’d done.

In the end I decided to buy glass varnish to add color to the resin since I couldn’t get the other materials to mix properly. It worked perfectly. The color was only a little darker than I intended but I think it’s not terribly noticeable. I finished the brooch and in the process became rather obsessed with making jewellery out of resin. So much so that I just bought my third package and feel like I’ve only just scratched the surface of what I can do with it.

The only downside is that it can’t take any heat since it would be perfect if I could bake it inside a polymer clay frame. As it is, if I want to mix the two, I’ll have to bake the clay and then glue the resin cab to the finished frame, but I’m sure that will also work.

I may do a tutorial post on resin soon, once I feel confident enough I know what I’m talking about 🙂

In the meantime, here are some of the first pieces I’ve done, mostly with cake sprinkles.

Experiências com resina – More resin jewellery

Depois de todos aqueles sprinkles, resolvi fazer peças de resina com outros objectos lá dentro. Foi super divertido.

O que aprendi durante o processo foi que é preciso planear a colocação dos elementos se for necessário fazer um furo mais tarde. Vidro, metal e outro materiais duros não são fáceis de furar e nalguns casos optei por utilizar a técnica de wire weaving em vez de fazer um furo para pendurar.


Pendentes cupcake com sprinkles no interior

Pendentes com o tema oceanos.
Vêem-se algumas bolhas de ar mas neste caso gosto do efeito porque parecem objectos
dentro de água.


Impressões em papel.
Estes não resultaram tão bem porque o papel não foi isolado convenientemente e ficaram
manchados pela resina. Fora as manchas, gostei do aspecto.


Pendentes com clips.
O da esquerda ficou durado porque lhe adicionei verniz para as unhas, que reagiu com a resina. Dá-lhe um efeito vintage.


Outro coração com sprinkles e um pendente de inspiração steampunk.
Fiz uma base curva em metal e deitei algumas peças de relógio para dentro da resina. Adicionei cor à  primeira camada de resina e depois deitei camadas posteriores transparentes para arredondar o topo.

Usei peças de relógio em plástico porque foi a primeira experiência e não quis arriscar-me a estragar as peças metálicas, que me custaram tanto a reunir. Afinal até resultou bastante bem. – After all those sprinkles I decided to make resin pieces with other objects inside. I can’t tell you how much fun it is.

What I’ve learned in the process is to plan the placement of the objects if you’re going to have to drill later. Glass, metal and other hard objects will not be easy to drill through and in some cases I opted for wire wrapping the whole piece rather than drill to insert a bail.


Cupcake pendants with sprinkles inside

Ocean themed pendants.
There are air bubbles in these but I like the effect because it looks like the objects are under water.


Paper inserts.
These were a fail because the paper wasn’t sealed properly.
I diluted the wood glue with water and I shouldn’t have.
Still, they look nice, aside from the unseemly blotches.


Paper clip pendants.
The one on the left turned a golden yellow because I added some nail polish to the resin.It gives it an aged effect.


Another heart with sprinkles and a Steampunk inspired pendant.
I made a bezel and dropped some watch parts into the resin.
I added color to the first layer of resin and then added extra clear layers on top to dome it. I used plastic watch part since this was meant as a first experiment and I didn’t want to risk ruining the better metal ones 🙂

Pinterest

Criei dois novos boards no Pinterest. O primeiro é para a bijutaria e funciona como portfolio, com as peças que mais gosto, mesmo as que já foram vendidas ou oferecidas. O segundo é para os cartões, incluindo os cartões para brincos, um modelo que criei o ano passado e que funciona como 2 em um – é um cartão e ao mesmo tempo embrulho para os brincos.

Valentine

For the past few years I haven’t cared much about Valentine’s day. It may seem important when you’re a teenager but close to forty I really don’t care anymore.

This year, however, I’ve noticed my husband has been a little down. Between illness, exhaustion, moodiness and plain disillusionment, it’s been tough, so I thought I’d do something sweet to try and cheer him up a little. Not that anything I do can make much of a difference, but the whole point of the cards and flowers ritual is to tell someone “I’m thinking of you and I care,” and sometimes that’s all you can do.

I got some peanut M&Ms (his favorite kind) and small glass jars with an old look to them. I separated the M&Ms by color, printed some labels and gave him a collection of “Medicine” bottles to help him overcome the worst days. Hey, sugar always works for me when I’m down 🙂

The frame I used for the labels is from Star Sunflower Studio.

medicine

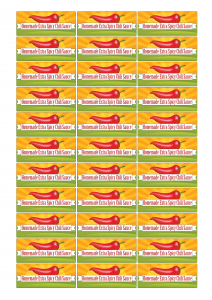
Chili pepper labels

This year there wasn’t a lot of money for Christmas presents so we tried to come up with ideas for homemade gifts. I made silver and gemstone jewelry for most of the women and even some glass bead necklaces with a cut cat lampwork bead focal for the young girls. There were also framed photos of our two kids for the grandparents and my husband made some chili pepper sauce for some of the men. He bought some cute jars, washed them and unfortunately the whole project stopped there. There was some glue from the price labels that wouldn’t come off and I had so much stuff to do on my end that I didn’t have time to help with that until after Christmas was over.

On the 28th I finally said enough. My brother is one of the people who loved the sauce the last time Pedro made it and he was flying back to England the next day so I got to work. I used rubbing alcohol to remove the rest of the glue from the jars, washed them again and filled them up.

When that was done I felt I needed to make a label for the sauce because otherwise people would just stick the jar on their pantry and later on might not remember what was in it. Unfortunately I didn’t have much time and didn’t want to spend days coming up with a design so I looked online for some printable labels. I didn’t find what I needed but I did find something that was pretty close: tomato canning jar labels.

Now, I want to state that I don’t normally copy someone else’s design and I wouldn’t have done it this time if I had more time and this was anything other than a couple of labels for family gifts. This time I really was looking for something that was already done so I wouldn’t waste too much time, and having a layout and cute colors already picked out made my life easier. I didn’t mean any disrespect for the original work or copyright infringement and do not claim ownership of the design.

In the end I wish it would have been as easy as removing a tomato and placing a chili pepper on the label but it wasn’t. The shape of the jar required long thin labels so I ended up having to redo the label anyway on Photoshop. I used this image for the chili pepper and just recreated the background from scratch in the same style and colors as the tomato label. It took longer than I had hoped but it turned out great.

I leave you with a printable sheet in case anyone else decides to make some chili sauce and needs to print labels. Just print on sticker paper, slice it up and you’re done.

Etiquetas de Natal

Hoje resolvi fazer etiquetas para as prendas de Natal. Como o espà­rito natalà­cio é todo sobre partilhar, deixo-vos o ficheiro que usei para imprimir as minhas em papel autocolante. É só imprimir numa folha A4 e recortar quadrados de 5 cm. O circulo branco permite escrever o nome da pessoa a quem queremos dar a prenda ou pode ficar só assim, como elemento decorativo sobre um papel liso.


– Flattening wire with a pasta machine

– It’s easy enough to buy square or half round wire in precious metals but it’s harder to find anything other than round wire in other metals.

The obvious solution to this problem is buying a rolling mill, or square drawing plates, but since they’re expensive, I was thinking of alternatives I could use. In the past, for smaller pieces, I’ve hammered the metal but it takes practice to get an even result.

I thought about my Sizzix but you’d have to keep opening and closing the sandwich and since the plates are plastic, I’m not sure it would work.

When I finally thought about the obvious solution I felt really stupid for not considering it before: I have a pasta machine!

In the picture you can see, from left to right, round 0,8 mm wire and next to it is the flattened version after going through the pasta machine on one of it’s thinnest settings (I think it was setting 8). Next to that is a 1 mm round aluminium wire and finally the flat version of the same on the thinnest setting. It makes a great flat wire for braiding or wrapping.

Annealing the copper wire may be necessary to make it soft enough.

I’m sure a lot of people have thought of this before since it seems so obvious but I decided to make a post just in case in can help anyone else.

Parede de molduras

Decidi agarrar nas molduras todas que ainda tinha embaladas desde a mudança e fazer uma parede de fotos de famà­lia. Temos uma parede comprida numa zona da sala que é principalmente de passagem e que ainda estava em branco. Quando andei a fazer a genealogia da famà­lia recolhi fotos dos nossos antepassados – os avós quando eram novos, bisavós e trisavós – e acho-lhes tanta piada que em vez de limitar as fotos a nós, pais e filhos resolvi fazer uma parede para a famà­lia alargada incluindo antepassados. Ainda faltam alguns elementos importantes como os nossos irmão e a minha nova sobrinha porque ainda não tenho fotos deles adequadas mas a parede tem espaço para expandir.

Como as molduras eram de diversas cores e feitios, comecei por lixá-las todas e pintar de preto. Depois usei cartolinas e papéis coloridos como fundo para as fotos e planeei a composição. No final foi só pendurar usando principalmente aquelas strips para quadros da 3M para evitar fazer montes de buracos na parede.

– Greeting cards for earrings

– When you make handcrafted jewellery there’s a certain amount of paper crafts involved in the process: you need labels, business cards, earring and necklace cards, background papers for photographing your jewellery (paper is much better than fabric as a background because it doesn’t collect dust, animal hairs or fluff can will look bad on a blown up image), thank you notes, etc.

Some people do everything on the computer (or have it done for them) and print it out, others like to use stamps, pattern paper and several handmade techniques to personalize their labels and cards. I use a mix of both. I created my logo and made the base layouts for my labels and cards but then I use pattern or coloured paper as a background.

My point is that I had already accumulated a certain amount of paper and materials and since I like paper crafts, I had fun this summer making some greeting cards.

It was so much fun, in fact, that I felt I needed to come up with a decent excuse to be able to keep making cards. I came up with an interesting idea that seemed absolutely obvious to me – making decorated earring cards.

I looked around on the internet thinking that it was so obvious that someone must have done it first and maybe it would save me time to see how other people had solved some of the technical aspects. I did find some earring greeting cards but they all featured the earrings on the front of the card. It’s a perfectly fine idea but I wanted the earrings on the inside so that they’re protected by the card itself and also to make them a surprise.

In the end this is what I came up with:

The outside is a typical 5″ square greeting card but it you can flip it inside out and display the earrings instead.

The butterfly digi stamp comes from Shery K Designs. She has truly wonderful free digi stamps.

I colored the stamp with watercolor pencils and used a decorated glitter design cardstock for the background.

Inside I used the same background paper and frame but left the center blank for the earrings. I made a little folded tab to hang the earrings that I glued onto the white cardstock.

The cardstock layers make the card pretty sturdy so the weight of the earrings isn’t a problem.

I’m pretty happy with the result and now I can make all sorts of variations. The frame can be square, round, oval, etc, and I can’t wait to try out different styles.

I may have to make a custom envelope, though, because of the card’s thickness.

– Alternative beading needles

– I’m not a great beader since I work mainly with wire and polymer clay, but once in a while I will incorporate cord into my designs. Since the end of the cord tends to fray and open up, I like using a large eye beading needle to thead the beads into the cord.

Unfortunately, it’s hard to find good beading needles in the area where I live, and if I need to order them online at a time when I don’t need to buy any other materials, I end up paying more for shipping than I do for the needles.

In a pinch I tend to make my own needles out of thin wire. It’s simple enough and it works great so long as the bead is not too tiny: Cut a piece of wire, fold in two, twist the two ends together leaving a loop to thread the wire and you’re ready to go.

The downside is that, since you have two ends entering the bead, one of them sometimes bends back and you can spend more time readjusting the needle than you do threading beads.

The other problem is that if the beads are too small, the pressure caused by the folded cord entering the bead can be too much for the thin wire and it will break but if you don’t have many beads to thread it works fine.

Recently, however, I’ve found another alternative beading needle that I really like.

About a year ago, I woke up one morning to find I had a new canine tooth popping out. Considering that I was 38 this seemed odd. My dentist denied my suspicions of possibly turning into a vampire (a troubling thought since I tend to pass out at the sight of blood) and told me that my current canine was in fact still a milk tooth and the new one had finally decided to emerge (better late than ever, I guess).

The result was that I had to get braces to help the new tooth along (missing a tooth at this age is neither cute nor very sexy, I can tell you that much) and this led to my discovery.

Braces make it very hard to floss, so my sister-in-law recommended a thing called floss-threaders. They’re basically thin plastic needles to help you thread the floss in between the brace wires. As soon as I saw them I thought “these would be great for beading!” and they are.

These are called “Eez-thu”, I can buy them at the drugstore and they come in packs of 25. They solve the two wire end problem, are very thin so they can even go though small seed beads and are actually quite strong.

The eye is really large so threading the wire is a breeze and they’re not even that expensive – they end up costing about 15 cents each. Plus, if you know someone who wears braces you can always share the cost and just keep a couple for yourself 🙂

I’m not saying they’re better than metal needles but they certainly work for me, and best of all, they’re easy to find.

– The Nut Factory – Nutter button

– My brother and my husband made a really cool game called Nut Factory for iphone and ipad. They spent a year of late nights and weekends working on it and I’m still surprised at how great it turned out considering it was just the two of them.

I wanted to help promote the game because the hard part with these things is getting people to realize such a game even exists. Being jewelry inclined, I decided to made a funny button to help take the message to the streets.

I made the button in dark blue polymer clay and stamped the message on it before painting it with white acrylic paint and wiping away the excess to highlight the letters and give it a textured look. For something so simple I think it turned out pretty cool.

I textured the back using a netting mesh and used a thin square to attach the pin.

And here’s how it looks on a real person:

If you want to know what the Nut Factory game is all about, you can visit the blog or the Facebook page.

Keep cutting!

Edit from 2018: the game is no longer available.