Arquivo da Categoria: Bijutaria

– Picture Locket

– I’ve been playing around with polymer clay again and I liked the idea of transferring black and white images onto the clay. It’s a simple process, though you have to practice a little bit because it’s easy to rub the ink off along with the paper if you’re not careful, and the result is an antique-looking image.

You can make just a pendant out of if and I thought about using pictures of my children to try it out, but since I have two I didn’t want to have to choose just one and getting a picture of the both of them is not an easy feat.

All this thinking got me to the conclusion that the best option for what I had in mind would be to make an old-fashioned locket since I could place both pictures inside. I was inspired by a picture of an icon box (you can check out my inspiration board on Pinterest) and made my locket out of copper-colored polymer clay.

I textured and aged it with acrylic paint and applied a gloss varnish. The pictures were transfered onto light flesh-tone clay. I used a natural stone cabochon on the cover, thread to bind both pictures and a lobster clasp to close it and also on top to attach it to a necklace, key-chain or anything else I want.

It turned out a bit larger than I had planned at first – 4 cm – because I didn’t anticipate the inside frame when I started making it, but since it’s polymer clay, it’s still quite lightweight. I plan to make a simpler version next and maybe a round one instead of square.

I think these lockets are a great idea for moms, especially if they like antique-looking objects, since they can have an original piece of jewellery and also pictures of their kids all in one.

Embellishing plain beads

Plain round glass beads can be pretty boring by themselves but we do tend to stock up on them because they add color while allowing more elaborate beads to pop. Unfortunately, sometimes you find yourself looking at a large quantity of those plain beads with little more to go on.

At such a time, I decided to consider it a challenge rather than a problem and made it a project to finding ways to embellish plain beads with wire and bring them out into the spotlight. I used bead cages, coils and other wire frames and mixed wire colors to add interest to the finished pieces.

In the first image you have a bracelet made from oval beads wrapped in coiled green wire (a shade lighter than the beads to make it stand out) and then wrapped again in copper wire with some seed beads thrown in. It’s really simple to make but visually it’s very effective.

The second picture shows a pair of earrings made from lampwork square beads. They’re beautiful by themselves but become more captivating through the use of a large coil at the end of the wrapped loop – a variation in the tiny coils used to finish off the wire. The coils add interest to a plain square or coin shaped bead and they also prevent the beads from turning so it’s a useful method to use in necklaces and bracelets as well.

Bead cages and weaving with colored wire turn plain blue beads into something special. – Plain round glass beads can be pretty boring by themselves but I do tend to stock up on them because they add color while allowing more elaborate beads to pop. Unfortunately, sometimes I find myself looking at a large quantity of those plain beads with little more to go on.

At such a time, I decided to consider it a challenge rather than a problem and made it a project to finding ways to embellish plain beads with wire and bring them out into the spotlight. I used bead cages, coils and other wire frames and mixed wire colours to add interest to the finished pieces.

In the first image (at the top) you have a bracelet made from oval beads wrapped in coiled green wire (a shade lighter than the beads to make it stand out) and then wrapped again in copper wire with some seed beads thrown in. It’s really simple to make but visually it’s very effective.

The second picture shows a pair of earrings made from lampwork square beads. They’re beautiful by themselves but become more captivating through the use of a large coil at the end of the wrapped loop – a variation in the tiny coils used to finish off the wire. The coils add interest to a plain square or coin shaped bead and they also prevent the beads from turning so it’s a useful method to use in necklaces and bracelets as well.

Bead cages and weaving with coloured wire turn plain blue beads into something special, as you can see in the last example.

– Bijutaria em FimoBijutaria em Fimo

colar marinho (detalhe)

Actualizei a loja com diversas peças de bijutaria esculpida em Fimo que tenho andado a realizar ao longo dos últimos meses. Espero que visitem e gostem das peças.

Tenho aprendido imenso sobre esculpir em Fimo e descobri que gosto muito de o fazer. A parte mais atraente é poder usar cor à  vontade e construir componentes à  medida das necessidades da peça. Aqui não há o problema de faltar mais uma conta para terminar o design perfeito – se for preciso faz-se mais uma.

As peças que mais gosto de fazer são os colares, pela complexidade, e graças a uns tutorials fabulosos da Christi Friesen consegui fazer umas peças muito giras. Depois de fazer o colar da selva seguindo o tutorial (tirando a flor decidi fazer em vez do pavão sugerido) desenhei o colar marinho utilizando a mesma técnica base mas criando do nada todas as formas e texturas e é a minha peça favorita do momento.

Polymergence Newsletter – edição de Abril – Polymergence Newsletter – April edition

Há umas semanas fui contactada por uma simpática senhora chamada Charlene Therien a pedir para incluir uma foto dos meus brincos de ovo estrelado na edição de Abril da Newsletter da International Polymer Clay Association, chamada Polymergence.
Fiquei feliz por poder contribuir uma peça e escrevi um pequeno parágrafo para acompanhar a foto.

fried_eggs_dee_02

Todos os trabalhos desta edição são baseados em ovos mas numa grande variedade de estilos, mostrado mais uma vez como a cerâmica plástica pode ser tão versátil. Os meus brincos destacam-se das restantes peças pelo facto de serem os únicos a ilustrar o interior do ovo em vez de se basearem na sua forma exterior mas isso não implica que sejam a peça mais interessante ou mais bonita.

Podem ler a newsletter aqui, e ver todas as outras fabulosas criações de diversos talentosos artistas de cerâmica plástica. – A few weeks ago I was contacted by a nice lady called Charlene Therien, asking if she could include a picture of my Fried Egg earrings on the April edition of the International Polymer Clay Association Newsletter, Polymergence.
I was happy to contribute and wrote a small paragraph to go with the picture.

fried_eggs_dee_02

All the pieces presented in this issue are egg-related but in a wide range of styles, showing how versatile polymer clay can be. My earrings stick out from the rest because they were the only item depicting the inside of the egg instead of being based on the outer egg shape but they’re hardly the most interesting or attractive piece.

You may read the newsletter here, and see for yourself all the fabulous creations by several talented polymer clay artists.

– Adventures in Polymer Clay

– When it comes to polymer clay I’m still very much a beginner. I’ve made a few things I like but haven’t developed enough of a technique to be able to make really perfect pieces. Not that perfection is always important. As with everything handmade, sometimes leaving your mark is actually a plus and, like everything else, the more you work the better you get.

I’ve picked up polymer clay again now because I wanted to do a specific pendant with color gradients. When I picked up the clay I noticed it had gotten really hard and flaky – it had been at least a year since I last used it for anything so that was no surprise. It was just a bit frustrating because instead of making my pendant I spent days reconditioning clay before I could get anything else done.

To recondition the clay I tried using baby oil, sewing machine oil and even a glycerin lubricant. Each seemed to work fine and none of the initial experiments seemed to have a negative effect on the curing process or the end result. I decided to stick with baby oil because it seemed the most harmless.

This was my reconditioning technique: I hammered the dry clay with a plastic hammer until it was reasonably flat and then rolled it on the pasta machine. It came out in flaky bits at the bottom so I added some baby oil and mushed it all into a ball. I let it sit for a bit (while rolling another color in the pasta machine, for example) and then come back to it, hammer it again and roll it again. After rolling it in the pasta machine about 10 times the clay started to get to the right consistency one more. Once or twice I added too much oil and it got really sticky so I let it sit for a few hours or overnight and it was fine again.

So after a day or two of this I finally got the pendant done and decided I should stick with the clay for a while longer, learn a few things and use up the leftover clay so it won’t get crumbly again.

I started by making a necklace from a tutorial by clay artist Christi Friesen. I had the tutorial for ages because I love the organic look of those leaves, even though it’s not a look I would have ever come up with on my own (I naturally tend towards more geometrical and abstract patterns) but I never got around to trying it out. I like the way the necklace turned out and I think I managed the general feel of the thing but some of the tendrils got a bit more squished than I would have liked and I’m sure it will turn out better if I make it again. I didn’t have mica powder to brush over the leaves so I used a loose powder eye shadow that worked just as well.

The matching earrings I made later turned out a little better.

At this point I wanted to explore color palettes so I picked up the last book I bought on the subject called Polymer clay color inspirations. It’s a really good book to help you brush up on color theory. I studied that in college and I’ve always been rather intuitive when it comes to color but it’s always helpful to refine some concepts once in a while. Also, I’ve used color in webdesign for many years but that is totally different from mixing clay in order to come up with a specific tone. It’s harder to fix mistakes, for one. The theory is the same but to instinctively know how much magenta or yellow to add is a trial and error process.

I wanted to make an Art Nouveau pendant and a flower cane seemed like a fun way to do it. Unfortunately I didn’t like the end result so I scrapped the cane. While I was cutting up the clay I decided to roll some of it that had an interesting color scheme through the pasta machine and ended up making a pendant and some earrings out of it.

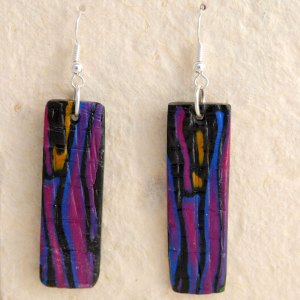
I like the earrings because they look like a painting. I textured the surface to add a little extra interest.

After this failed attempt I decided to stick to color schemes that can’t go wrong and went with warm colors and a different technique.

I made a bunch of sheets in tones of yellow, orange, red and burgundy, cut circles out of each, stacked them up, extruded the resulting log that I then cut into nine parts, arranged them into a cube and cut that into slices. From these square slices I made a brooch and some earrings that remind me of Kandinski’s farbstudie quadrate painting (only not so colourful).

You can still tell where the seam is because I didn’t want to mess with the surface of the pendant too much. Apart from that I think it works.

Next I think I’m going to tackle surface textures. I just need the picture of the finished product to pop up in my head first because even when I’m working on book or tutorial projects I never like to do something that’s exactly like the example given. What’s the point in that? I believe you should always put a bit of yourself in everything you do even if it’s based on someone else’s work.

– Stacked bead earrings

– I wanted to use gemstone chips to make some earrings. The simpler way is to stack them onto a simple ear wire with a hammered end.

Unfortunately, most chips have very small holes and the garnet chips were the only ones that would fit. The other option is to wrap them around the ear wire like some previous earrings I made with small rondelles.

In order to prevent the beads from slipping out the other end, I hammered the curve slightly (after I took this picture).

The stacked chips idea didn’t quite work but I liked it, so I made a couple more earrings with the same feel but using glass rondelles.

These two examples have a different feel because the rondelles are all the same size and shape, creating a much tidier par of earrings, unlike the chips that give the piece a rougher, more natural and casual look. They still look good, though.

The red ones are my favorite of the two. The underside of the beads has an AB coating so they change color between a lighter or darker red according to the light.

– Novos brincosNovos brincos

– Brincos simples, forjados a partir de um único arame com uma ponta martelada para segurar as contas, que são empilhadas em coluna. As contas irregulares (chips) de pedras naturais ou as contas redondas achatadas (rondelles) são as que ficam melhor neste modelo. As contas achatadas, de forma regular, dão um ar mais sóbrio enquanto que o uso de contas irregulares ou até com bicos são mais informais. Estes brincos são um bom exemplo de como é possível fazer algo simples mas com impacto visual. Também é possível jogar com o comprimento dos brincos e número de pedras para efeitos diferentes.

Brincos simples, forjados a partir de um único arame com uma ponta martelada para segurar as contas, que são empilhadas em coluna. As contas irregulares (chips) de pedras naturais ou as contas redondas achatadas (rondelles) são as que ficam melhor neste modelo. As contas achatadas, de forma regular, dão um ar mais sóbrio enquanto que o uso de contas irregulares ou até com bicos são mais informais. Estes brincos são um bom exemplo de como é possível fazer algo simples mas com impacto visual. Também é possível jogar com o comprimento dos brincos e número de pedras para efeitos diferentes.

– Going Victorian

– I love to get inspiration from history when it comes to making jewelry and, after trying out egyptian, celtic and medieval inspired pieces I decided to try making some victorian-looking ones. To make the dainty flowers that serve the purpose of focal beads on the first few necklaces and earrings, I used flattened bead caps as backing to support small beads and crystals wired together to make little flowers. This gave me the oportunity to finally use some of the multiple seed beads I’ve collected over the years but rarely use. I used thin wire instead of beading floss to make these flowers because I hate the way beading wire tends to strech or come undone so I don’t trust it to last. Wire can also break, sure, but even if it does you don’t usually lose all the beads in one go like you do with beading floss.

I started working with purples because I had a wider selection of beads in those tones and it suits the time of year but I’m also thinking about making some pieces in black for a more gothic feel and in red, possibly with coral beads.

– Seed bead hell

– Well, I guess you can tell from the picture what the problem is.

When I started making jewelry I got a good collection of sed beads. I made a few simple pieces with them but I soon figured out I had no patience for it. I’m a bit of a klutz so I kept finding new ways to spill all the beads over myself or the floor and then taking hours trying to find them all again. And even if I didn’t drop them, the beading needle or stringing material would just fling a couple of beads across the room once in a while or the beads would stick to my hand and fall off at inconvenient times. It just got on my nerves.

I stored the seed beads in boxes with dividers and never looked at them again. Then I moved, and somehow the beads escaped their dividers and got all mixed up. I let them sit another year because I just couldn’t face the task of untangling that mess.

Now, however, I started making designs that call for seed beads. Not entirely in the conventional beading way, where you use nothing else, but as smaller beads in flower designs, for example. That means I finally had to open the boxes and start organising thee beads by color and size so I can quickly figure out if I have what I need while i’m working on a new piece.

The first part wasn’t too bad. Since the deviders proved to be unreliable, I decided to store the beads in little plastica bags instead of having them loose. It also reduces chances of spilling a whole box full of beads – learning from past mistakes is always a must, right?

Soon enough, though, I got to the bigger mess: the beads that got all mixed up. This part is going to take me days, I’m sure. Oh well, enough procrastination. Lets start sorting…

– Argolas de prataArgolas de prata

– Colecção de quatro brincos de argolas em prata com pequenas pedras facetadas em tons de roxo, azul, verde e laranja.

Estes brincos são muito leves e confortáveis de usar porque não abanam muito. Como são fechados, são também mais difà­ceis de perder do que os brincos com gancho.

As argolas de prata medem entre 2,7 e 3 cm de diametro e as contas têm cerca de 4 mm.

Questões e encomendas pelo email dee@dee-dee.netColecção de quatro brincos de argolas em prata com pequenas pedras facetadas em tons de roxo, azul, verde e laranja.

Estes brincos são muito leves e confortáveis de usar porque não abanam muito. Como são fechados, são também mais difà­ceis de perder do que os brincos com gancho.

As argolas de prata medem entre 2,7 e 3 cm de diametro e as contas têm cerca de 4 mm.

Questões e encomendas pelo email dee@dee-dee.net

– Spring berries bracelet

– It’s been raining all day so I made a colorful bracelet to cheer me up. It’s more appropriate for a spring collection than fall but I don’t really care 🙂

The design has a nature theme, kind of like a berry bush or a creeper plant and I chose carnelian beads for the berries, perdidot and aventurine for the leaves and rhodochrosite for the small flowers. The wire is silver and I thought about oxidizing it at first but I think it might be too dark after all so I’m leaving it shiny for now.

I love these plant-type pieces and had made a necklace in the same line a few years back with brass wire and glass leaves. I used onlye blues and greens and the space between the beads was much wider, making it look lighter but the basic idea is the same. The necklace also had a leaf-inspired clasp that I still like. I didn’t do that for the bracelet because it looks better if it’s a wide uninterrupted band all around the wrist instead of having a big gap for a clasp.

There are many possible variations within this nature-inspired model – using small pearls for a bridal version, making side branches of different lengths, and so on – and I plan on making more along the same lines.

– New bracelets

– Since I’m waiting for client feedback on two of the custom pieces I’ve been making, today I started working on Christmas stock. I should have started by now but nearly a month with my daughter sick at home set me back a bit.

Aside from the more elaborate pieces I love to make, I always try to have a few simpler ones. The bolder pieces are great for special occasions but for everyday wear people tend to go for jewelry that’s pretty but subtle.

With that in mind I made a couple of simple bracelets, one golden and one blue. To keep them from being too ordinary I added a nice wire wrapped S clasp with some metal beads in the center. I feel that sometimes it’s not necessary to make something terribly flashy for it to stand out as long as you concentrate on some nice details.

The first bracelet was made with brass wire, glass beads with gold foil inside, honey yellow rondelles and gold plated metal beads. I started with the larger focal beads and added the other elements and metal color that seemed to fit better. The S clasp is wrapped in thinner brass wire with some gold plated beads in the center.

For the second bracelet I used the same basic model but added four rondell beads in the center rather than just one focal bead, then used smaller crackle rondelles on the sides and some spacers to add a little texture.

I used steel wire for this one and wrapped blue wire around the clasp to make it match the rest of the design and also to avoid leaving such a large of steel color. This way, even if the bracelet moves on the right and gets turned around, there’s always blue all around. I thought that was a nice touch.